Planning a shower update in 2026 and wondering which shower renovation ideas actually make a difference in daily life? I will walk through shower renovations that improve comfort, storage, and long-term durability, including shower renovation before and after choices that change how a bathroom feels and functions. We will also cover shower renovation on a budget and shower renovation diy options that still look modern, plus practical solutions like shower renovation with window layouts, shower renovation with tub combinations, and shower renovation tile upgrades that hold up over time.
1. Shower Renovation Ideas For Modern Homes In 2026
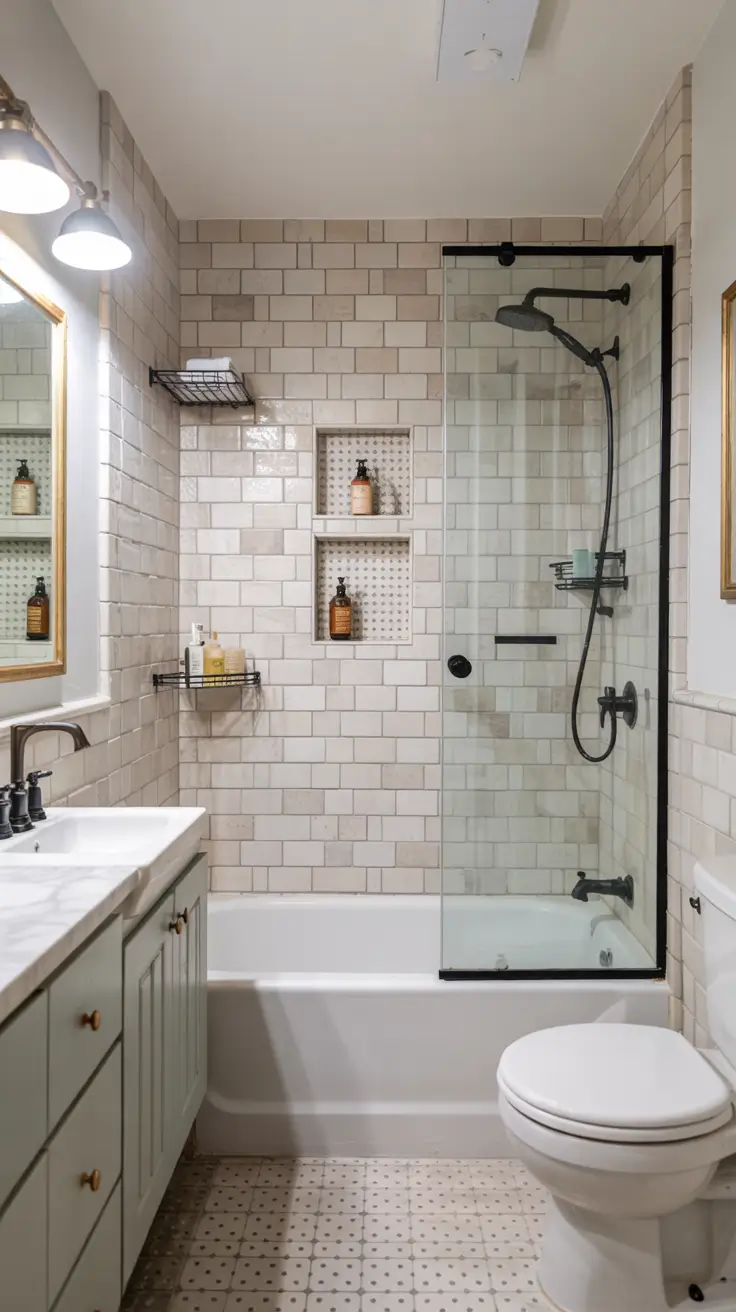
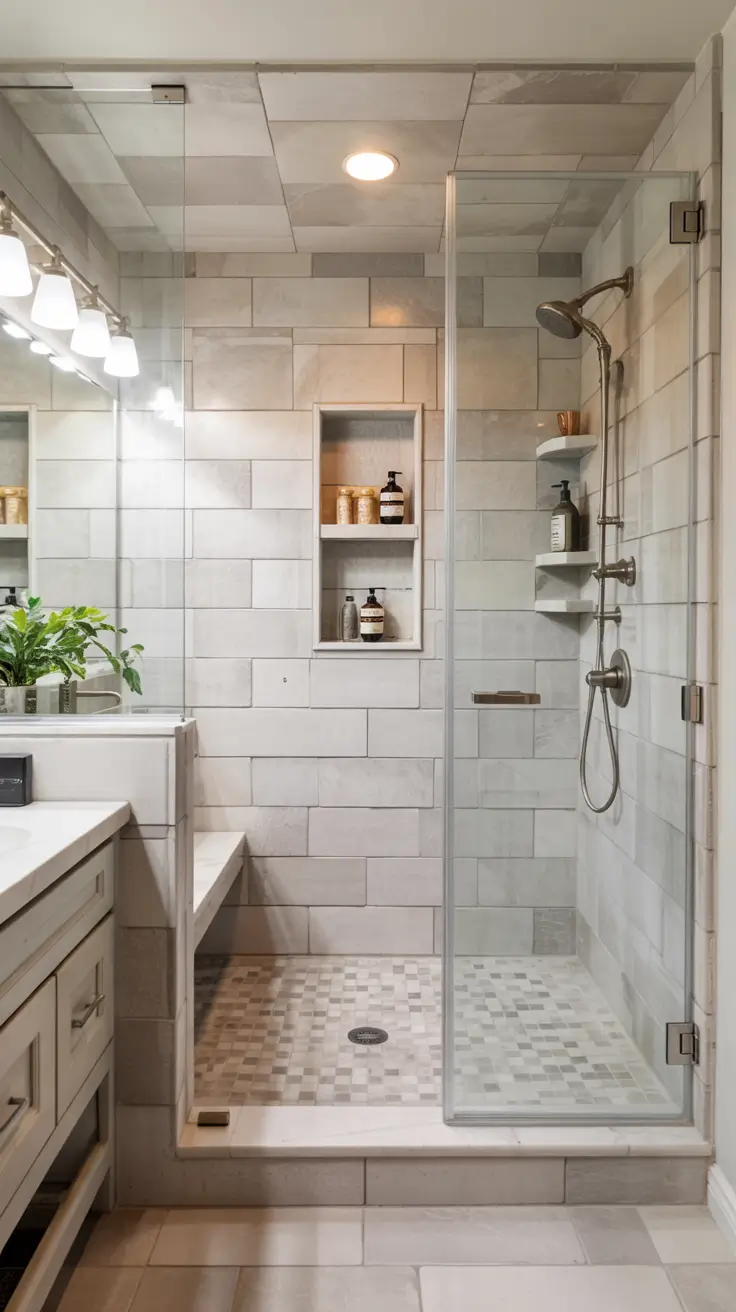
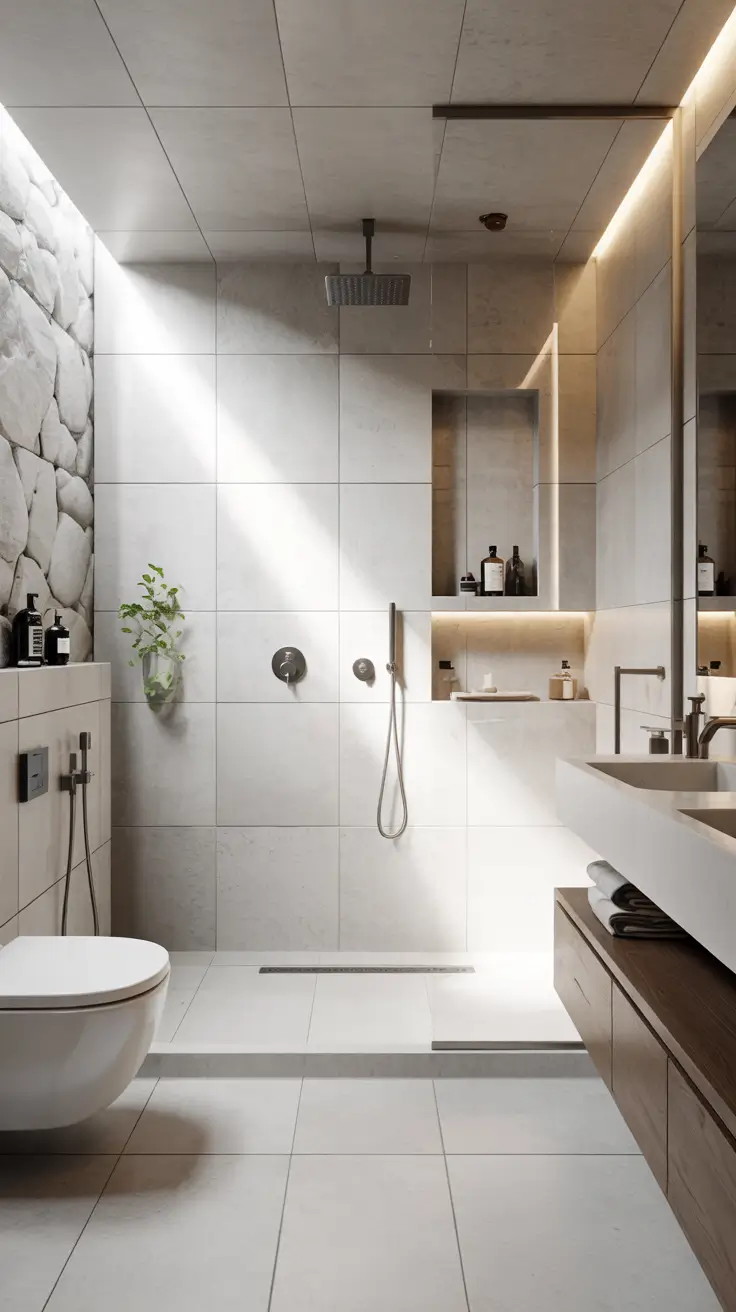
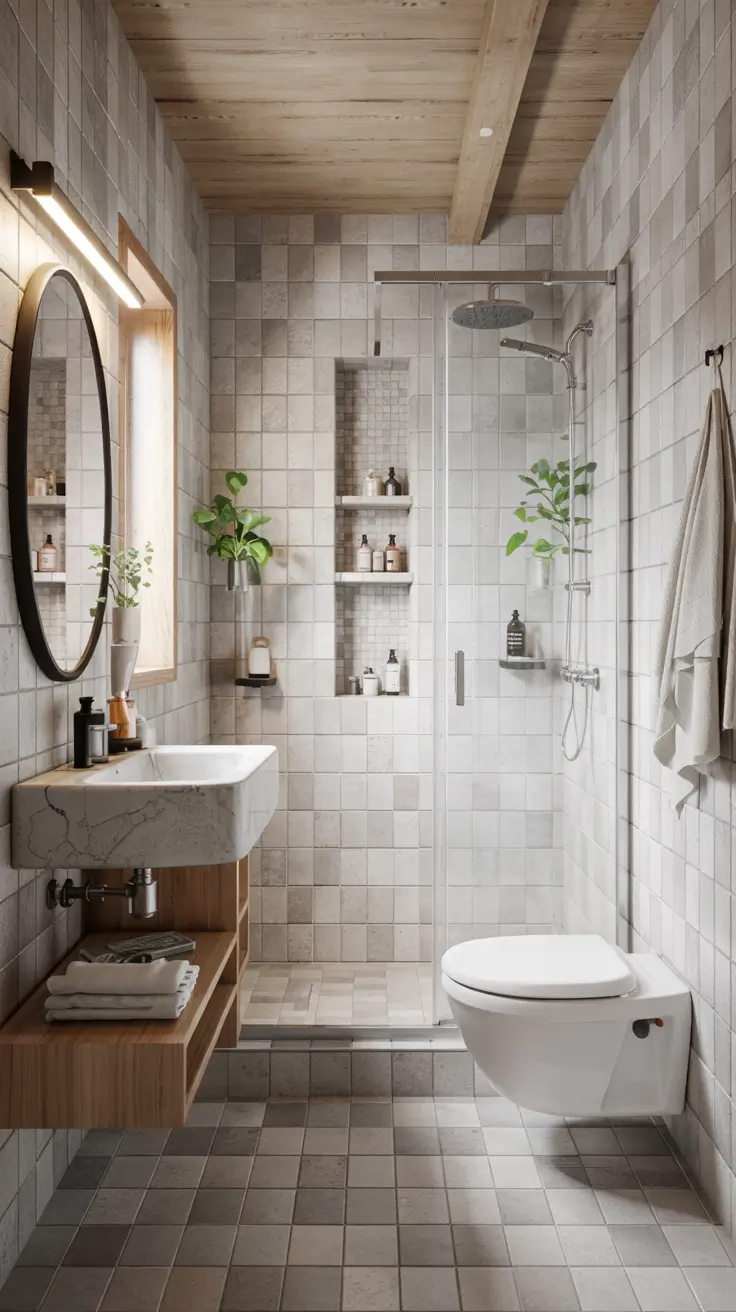
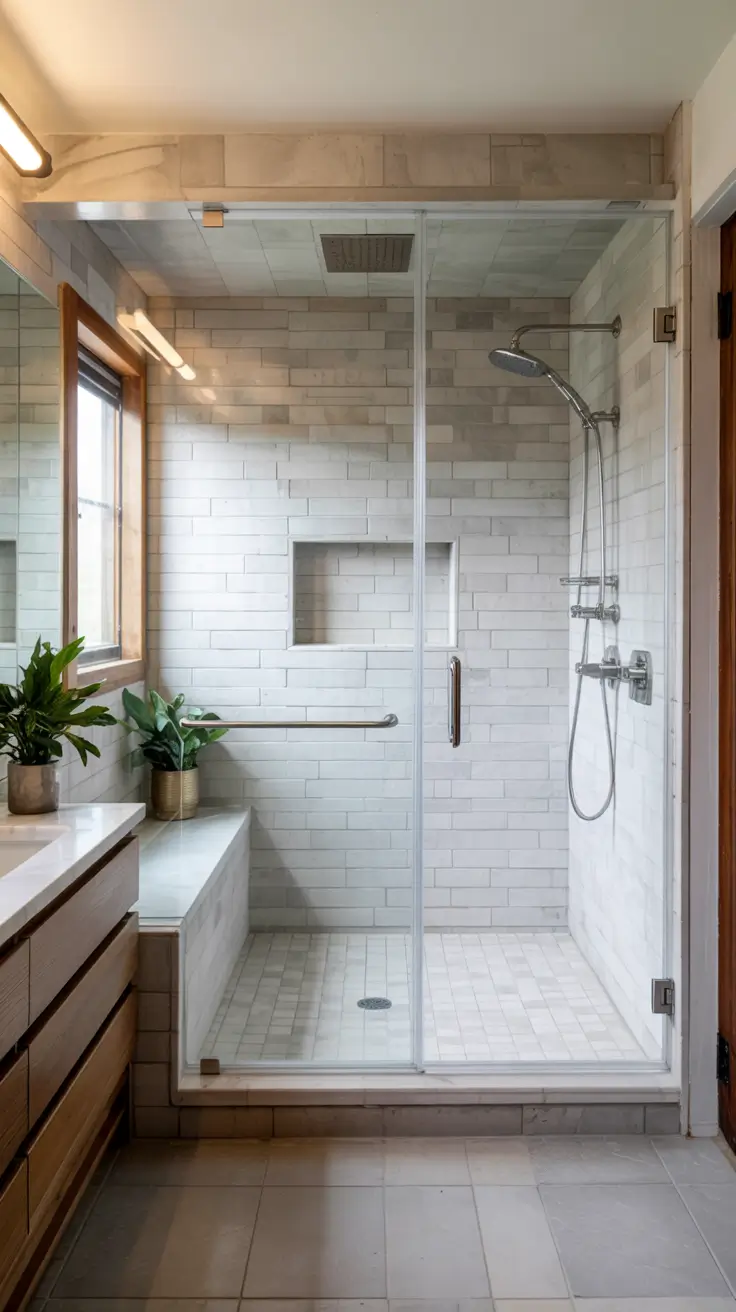
In 2026, I see modern showers leaning into calm, clean lines with smarter function rather than flashy extras. A modern plan usually starts with a clear layout, a comfortable entry, and surfaces that are easy to maintain. I like to design the shower as a complete zone with balanced lighting, good ventilation, and a cohesive palette that ties into the rest of the bathroom. This approach works in a small bathroom or a larger primary suite because the priorities are the same. When the basics are right, the shower looks current for years instead of feeling trendy for a season.
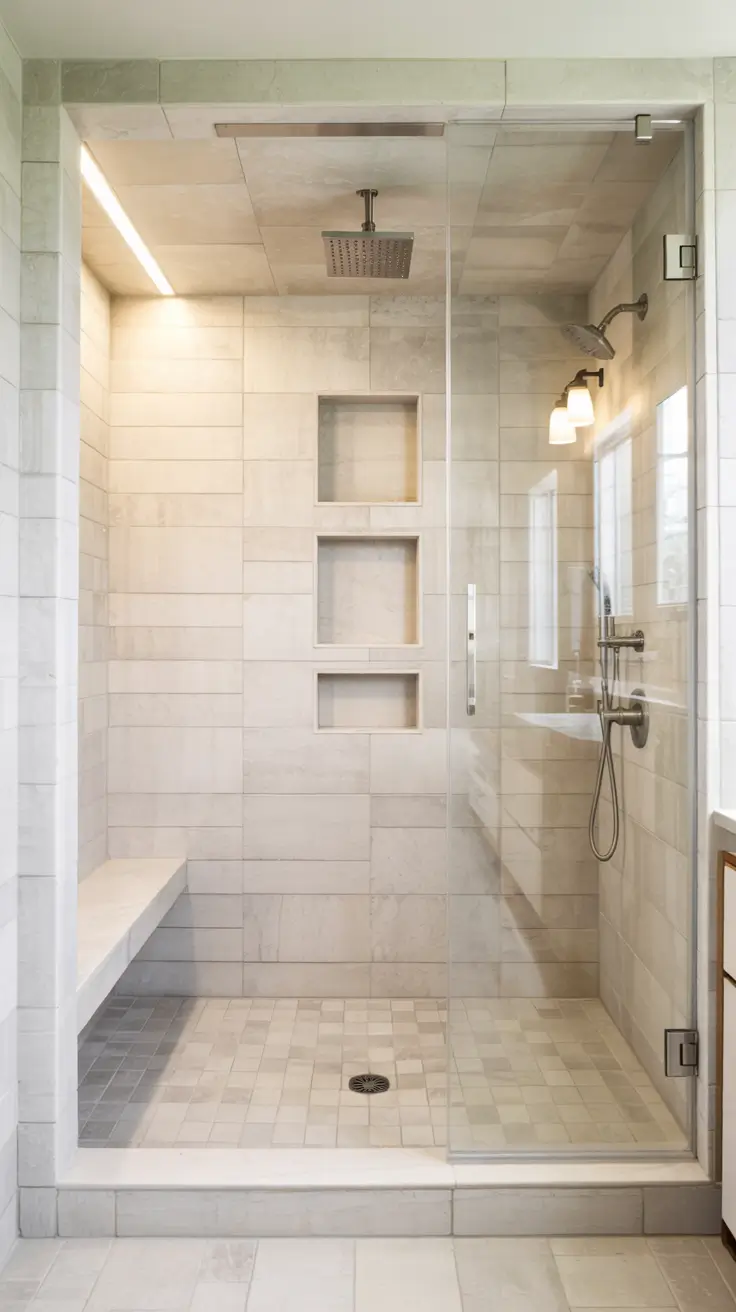
For a modern look, I rely on large-format wall tile or a simple microcement style finish, paired with a frameless glass screen. I add a recessed niche at arm height, plus a secondary lower niche for shaving items or kids’ bath products. A linear drain at the back wall helps the floor look sleek, and it lets me use a single slope that feels stable underfoot. I also like a wall-mounted bench or a compact corner seat so the shower can be used comfortably at any age. Finishing details like matching hardware, a quiet exhaust fan, and warm LEDs make the space feel intentional.
In my experience, “modern” works best when it still feels inviting, so I avoid harsh lighting and overly cold finishes. I often choose a warm white tile, soft gray grout, and brushed metal hardware to keep the look clean but not sterile. If I am planning a master shower renovation ideas layout, I also consider daily routines, like whether two people will store products there or need faster drying towels nearby. A simple rule I follow is to reduce visual clutter, then add comfort back in with texture like ribbed glass, matte tile, or a wood-look porcelain accent. When I do that, the shower reads modern and still feels like a place you want to start the day.
What I would add to this section is a quick measurement checklist before choosing finishes. I always confirm exact shower width, door swing or screen placement, and the location of studs for future grab bars or accessories. I also plan where a squeegee and towel hook will live so the glass stays easy to maintain. If you are upgrading plumbing, it helps to note current valve depth and pipe placement, because that can affect how “flush” your trim sits. Those small planning steps protect the modern look from looking improvised later.
2. Shower Renovations That Completely Transform Bathrooms
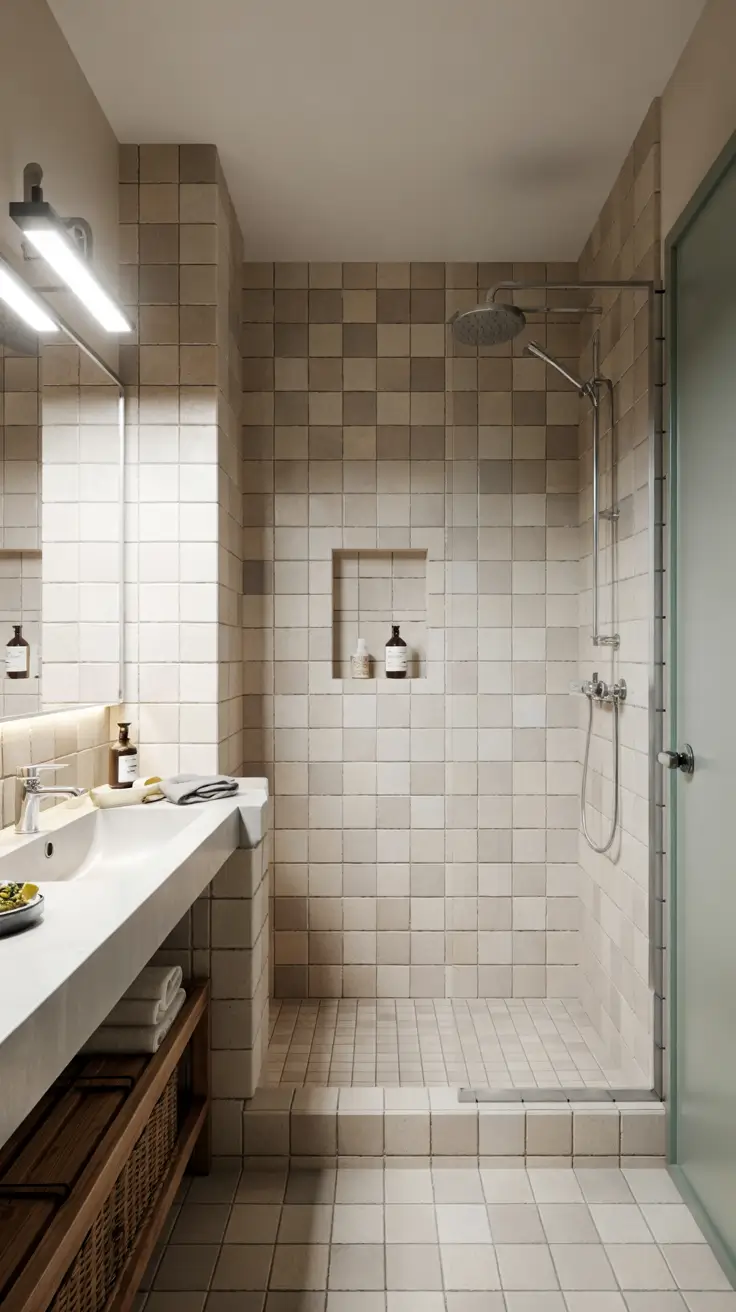
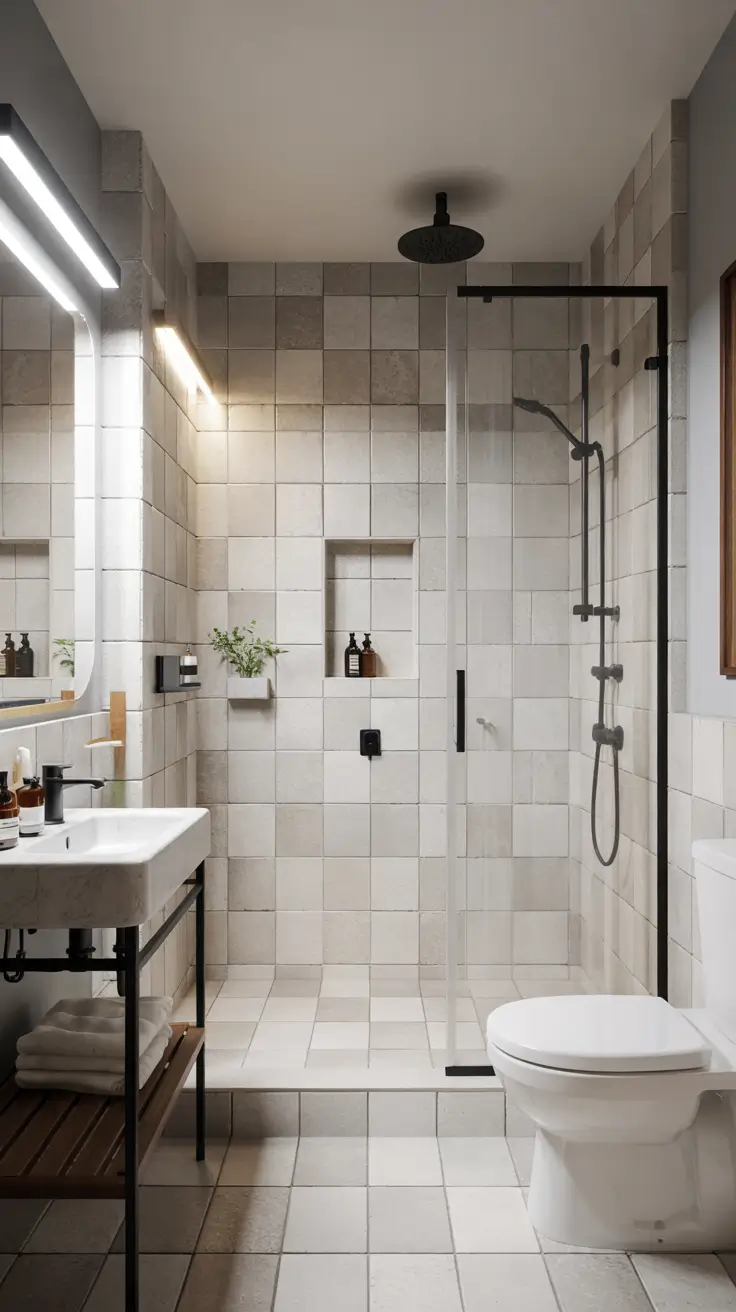
A shower can transform the whole bathroom when it changes light, circulation, and how open the room feels. I often see the biggest impact when a bulky enclosure is replaced with a clearer layout that lets your eye travel across the space. Even with the same footprint, a better shower design can make the bathroom look wider and brighter. The key is to treat the shower as a visual anchor rather than a closed box. When it is done right, the entire room feels more breathable.
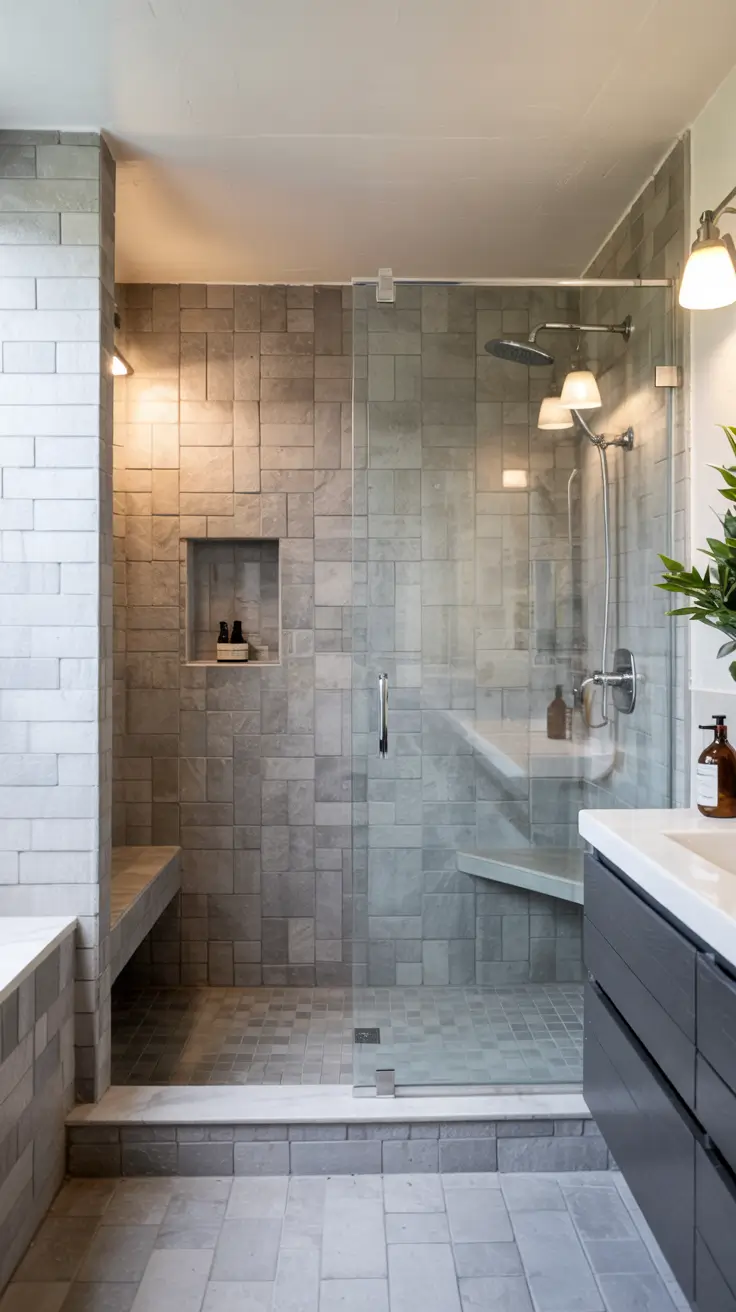
I like to start by choosing the right type of enclosure for the room. In many bathrooms, a fixed glass panel with a walk-in entry makes the space feel larger than a hinged door. I also use continuous flooring when possible, so the shower floor relates to the main bathroom floor in color and scale, even if the texture differs for slip resistance. Another transformation tool is a statement tile wall, like vertical stacked tile or a subtle stone mosaic, used on one surface so the room has a focal point. Pair that with a practical niche, a bench, and well-placed lighting, and the shower becomes the “designed” part of the bathroom.
When I compare bathroom renovations with bathtub shower combo layouts versus a dedicated shower, the dedicated shower often changes the daily experience more than people expect. It feels simpler to clean, easier to access, and more comfortable for quick routines. If you still need a tub, I design a bathtub shower combo that looks intentional, like a tiled tub surround with a glass screen and a handheld sprayer. That way you keep flexibility without making the space feel compromised. A well-designed shower can be the difference between a bathroom that feels dated and one that feels newly renovated.
What I would add here is a lighting and reflection plan, because it is often the hidden “transformer.” I place a shower-rated recessed light over the wet zone, then add a softer light source elsewhere so the room does not feel like a spotlight. I also consider where mirrors and glass will bounce light, especially in bathrooms with one small window. If the room is dark, I will pick lighter tile and a clearer glass treatment to spread the light. These choices can make a dramatic difference without changing square footage.
3. Shower Renovation Before And After Design Inspiration
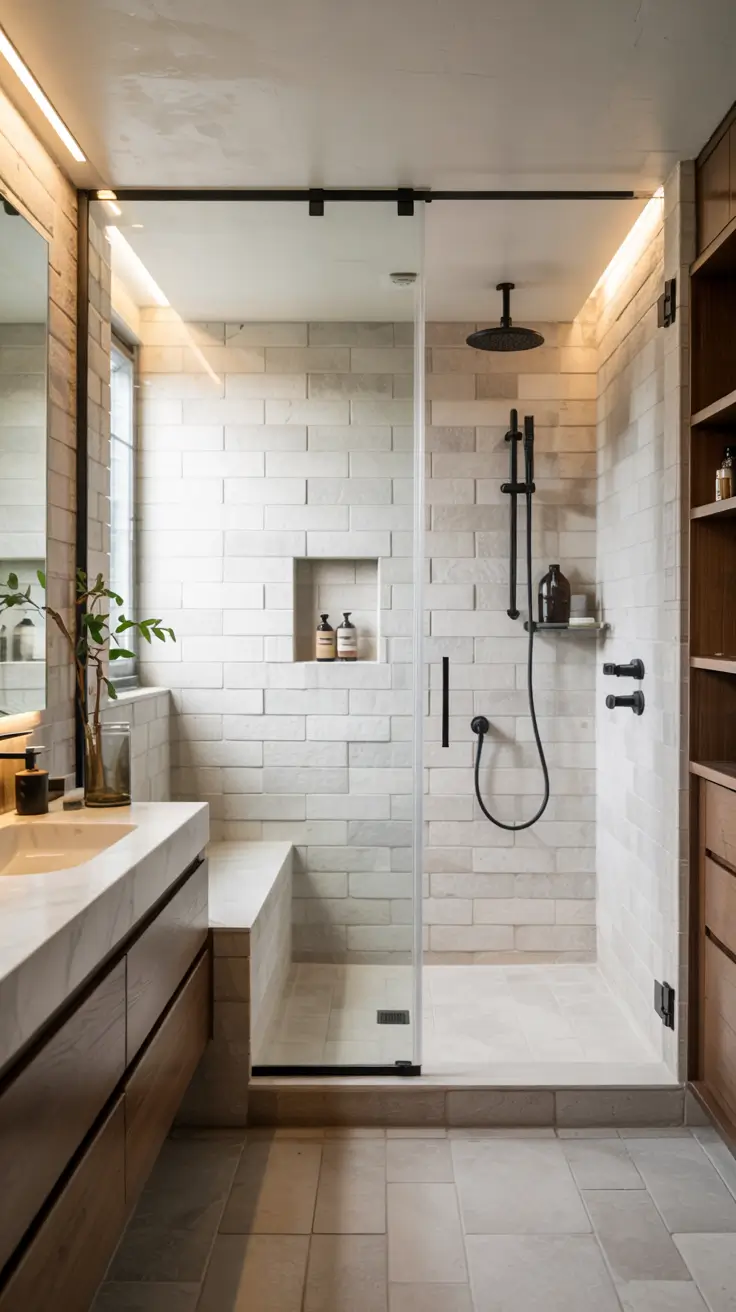
Shower renovation before and after results usually come down to three things I can control: layout, surface continuity, and storage. In many “before” showers, I notice awkward doors, visual clutter from too many finishes, and little to no practical storage. The “after” version looks calmer because the layout is clearer and the materials are coordinated. I like to use a limited palette so the shower looks larger and more intentional. That same approach can work in an apartment bath, a small bathroom, or a master suite.
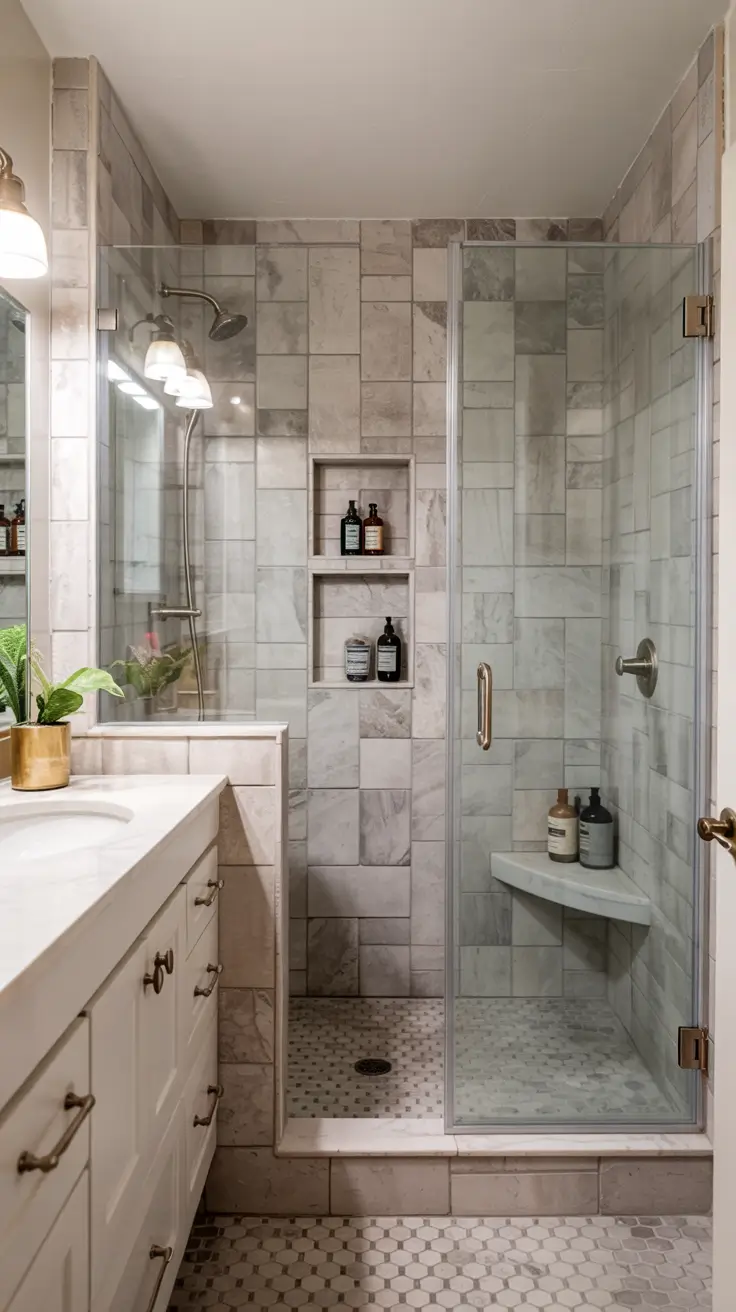
For a strong before and after, I typically update the wall surfaces first with durable shower renovation tile that fits the scale of the room. Large tiles reduce grout lines, while smaller tiles can add grip on the floor, so I balance both depending on your needs. I add at least one niche and, if space allows, a slim ledge that runs along a wall for everyday bottles. If the old shower felt cramped, I consider a glass panel instead of a full enclosure, and I keep the hardware consistent across the shower and vanity. Small upgrades like a better showerhead, a handheld sprayer, and a pressure-balanced valve also change how the shower feels, not just how it looks.
When I look at “after” photos that still feel underwhelming, it is often because the renovation skipped the unglamorous details. Even beautiful tile can feel cheap if the grout color fights the tile, or if the trim is mismatched. I also pay attention to shelf heights and niche width, because if your bottles do not fit, the shower will look messy again in a week. The best inspiration photos usually show a shower that is both styled and realistic, with storage built in and surfaces that can be maintained. I always aim for that balance because it keeps the renovation satisfying long after the photos.
What I would add to this section is a simple way to document your “before” so the “after” is easier to plan. I take straight-on photos from each doorway, measure wall lengths, and note where the plumbing and venting are located. I also list what annoys me daily, like splashing, poor drainage, or nowhere to put products. Then I translate that into design choices like a longer glass panel, a linear drain, or a deeper niche. This turns inspiration into a plan you can actually execute.
4. Shower Renovation On A Budget Without Sacrificing Style
A shower renovation on a budget can still look polished if the money goes to the right places. I focus on what you touch and what you see first, because those choices define the experience. Clean tile installation, simple shapes, and consistent finishes usually read more expensive than complicated patterns done cheaply. I also plan for easy cleaning, because a “budget” shower that is hard to maintain quickly feels frustrating. When the fundamentals are handled well, the shower looks intentional even with modest materials.
For shower renovation ideas on a budget, I like to use a classic tile shape like 3×6 subway, a larger 12×24 porcelain, or a simple vertical stack tile. I pick one wall for a subtle accent and keep the other walls quiet, which reduces cost without losing style. I also choose a standard-sized niche insert or create a simple recessed niche with clean edges rather than adding multiple niches. If you want a glass look, a fixed panel can be cheaper than a full door system, and it can still feel modern. Hardware upgrades like a new showerhead and a matching drain cover can also lift the look without major construction.
In small shower remodel on a budget bathroom renovations, I often get the best results by keeping the plumbing locations the same. Moving drains and supply lines can multiply costs quickly, so I redesign within the existing layout and improve the finishes and storage. I also like mid-range porcelain tile because it is durable, water-resistant, and available in modern looks like stone, concrete, or terrazzo. If the budget is tight, I would rather simplify the tile design than reduce waterproofing or skip proper slope and drainage. Those hidden steps protect the shower long-term and prevent costly repairs later.
What I would add here is a short “budget priority list” so you do not overspend on the wrong items. I prioritize waterproofing, drain and slope quality, and a reliable valve first. Next I prioritize the tile installer’s skill and clean trim details, because workmanship is what makes affordable tile look high-end. Then I add small upgrades like a better showerhead, a handheld sprayer, and good lighting. If anything is left, I invest in storage like a niche or a bench, because that keeps the shower looking tidy every day.
5. Shower Renovation Ideas On A Budget For Any Bathroom Size
Budget-friendly design looks different in a tiny bathroom than in a larger primary bath, but the strategy stays the same. I start by simplifying the visual field so the space feels calmer and more spacious. In a small bathroom, fewer transitions and fewer materials make the room look bigger. In a larger bathroom, I use budget choices to create a cohesive “suite” feel, like matching finishes and repeating tile tones. The goal is to look consistent and well-planned, regardless of square footage.
For tiny and small bathroom showers, I like bright wall tile, a clear glass panel, and a compact shelf plan. A corner niche or a vertical niche stack can hold products without stealing elbow room. If a tub is necessary, bathroom renovations with bathtub shower combo layouts can still feel modern by using a clean tiled surround and a simple glass screen instead of a curtain. In larger rooms, I might do a double shower look by creating symmetry with two niches and a wide showerhead layout, even if the plumbing stays relatively simple. When the details repeat, the shower reads more premium without requiring premium materials.
I also pay attention to how the shower relates to the vanity and the rest of the room. Matching the shower hardware to the faucet finish makes the bathroom feel “done,” even if each piece is from a modest price range. I often use one hero element, like a textured tile strip, then keep everything else straightforward. This approach works for “cheap” upgrades that still look modern, because the design feels deliberate rather than scattered. The best budget results usually come from restraint, not from trying to include every trend at once.
What I would add to this section is a practical list of where to use standard sizes to save money. Standard shower pans, standard glass panel widths, and common tile sizes usually cost less and are easier to install. I also like to choose readily available trim profiles, because custom trim can add time and expense. If you want a custom look, I focus on layout and proportions rather than rare materials. That way the shower feels tailored while staying within a budget.
6. Shower Renovation DIY Projects Anyone Can Handle
A shower renovation diy plan can be realistic if you choose tasks that fit your skill level and protect the waterproofing system. I treat the shower as a high-moisture environment where mistakes can hide until they become expensive. That is why I separate “safe DIY” projects from work that is better handled by a pro. Many homeowners can still get a big upgrade by improving storage, finishes, and comfort without touching the core waterproofing. With the right project selection, DIY can feel empowering instead of risky.
DIY-friendly upgrades include swapping a showerhead, adding a handheld sprayer if the plumbing allows, and updating visible hardware like handles and trim when it is compatible. I also like peel-and-stick upgrades outside the wet zone, such as a new mirror, improved lighting, or better towel storage that supports the shower routine. Inside the shower, I am cautious, but you can often add a surface-mounted corner shelf, a tension pole caddy, or a better curtain and rod if you have a bathtub shower combo. Regrouting and recaulking can also make a shower look cleaner and newer, as long as you remove failing material properly and let everything dry before sealing.
In my experience, the DIY projects that feel most satisfying are the ones that reduce daily friction. A new showerhead can improve water feel, a better shelf setup can eliminate clutter, and fresh caulk lines can make the shower look cared for. I also recommend testing ventilation and improving the exhaust fan, because good airflow reduces mildew and keeps finishes looking new. If you are tempted to DIY tile, I would keep it to small, non-critical areas unless you have experience with waterproofing membranes and proper slope. A beautiful tile job is great, but a dry and durable shower is the real win.
What I would add to this section is a DIY safety checklist so the work stays practical. I always turn off water at the correct valve before any plumbing swap and confirm there are no leaks after reinstalling. I use mildew-resistant caulk where appropriate and keep a consistent bead for a clean finish. I also plan drying time, because rushing grout or caulk is one of the fastest ways to create problems later. If anything requires opening walls or altering drains, I treat that as a sign to bring in a professional.
7. Shower Renovation With Window For Natural Light
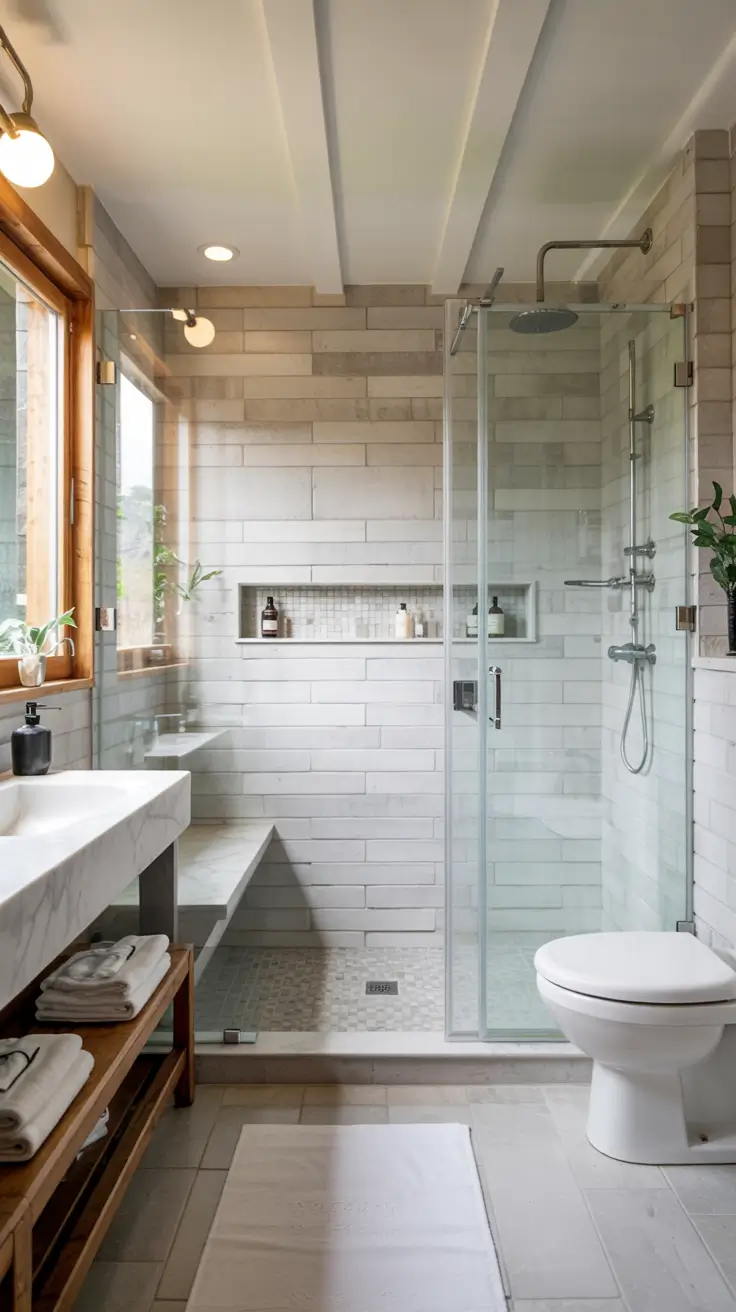
A shower renovation with window can be one of the most beautiful upgrades, but it needs careful planning for privacy and water protection. Natural light makes tile textures look richer and can make a small bathroom feel more open. I like to treat the window wall as a design feature, not something to hide, while still keeping it practical. The key is choosing materials and detailing that can handle moisture and daily cleaning. When it is done correctly, the window becomes a highlight instead of a worry.
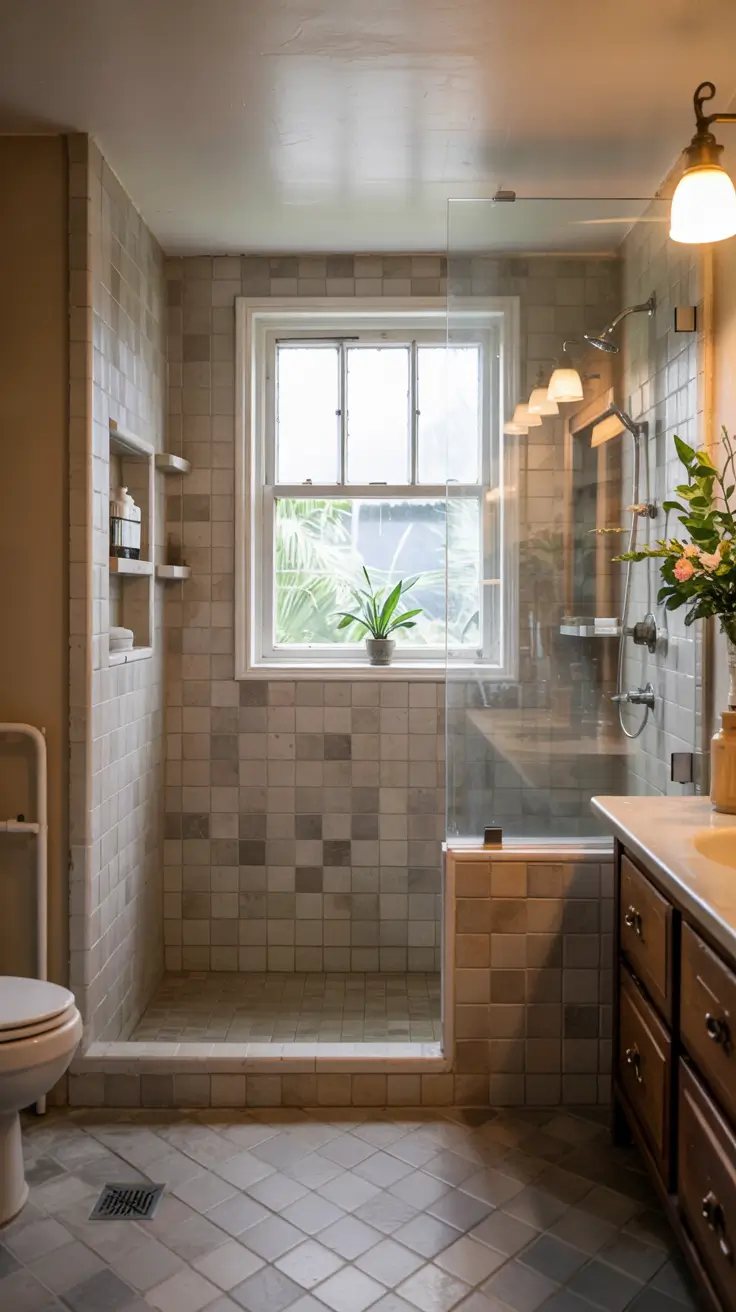
For the window itself, I prefer moisture-safe trim materials and a clean sill detail that sheds water. I often use a solid-surface sill or a well-sloped tiled sill, and I make sure the corners are sealed properly. For privacy, I like frosted glass, ribbed glass, or a top-down shade placed outside the wet zone when possible. In terms of tile, I keep the window surround simple so the cuts look clean, and I avoid overly busy patterns right around the frame. A frameless glass panel can help keep splash contained while still letting light reach the rest of the bathroom.
In my own projects, I have found that window showers feel best when the layout respects the light. I place the main showerhead so water is not blasting directly at the window, and I use a handheld sprayer for controlled rinsing near that wall. I also pay extra attention to ventilation because sunlight helps, but airflow does the heavy lifting against moisture buildup. If you want a spa feel, this is also a great setting for a steam-friendly look, but true steam showers require specialized sealing and a tight enclosure. Even without steam, the natural light can make the shower feel calmer and more premium.
What I would add here is a clear plan for privacy and maintenance from day one. I decide whether the window glass will be obscured, whether a shade is needed, and how it will be cleaned safely. I also choose grout and sealers that resist staining, especially on the sill where water sits longest. If the window is older, I consider upgrading it during the renovation so the shower is not built around a future replacement problem. These details protect the light-filled look and keep it practical for everyday use.
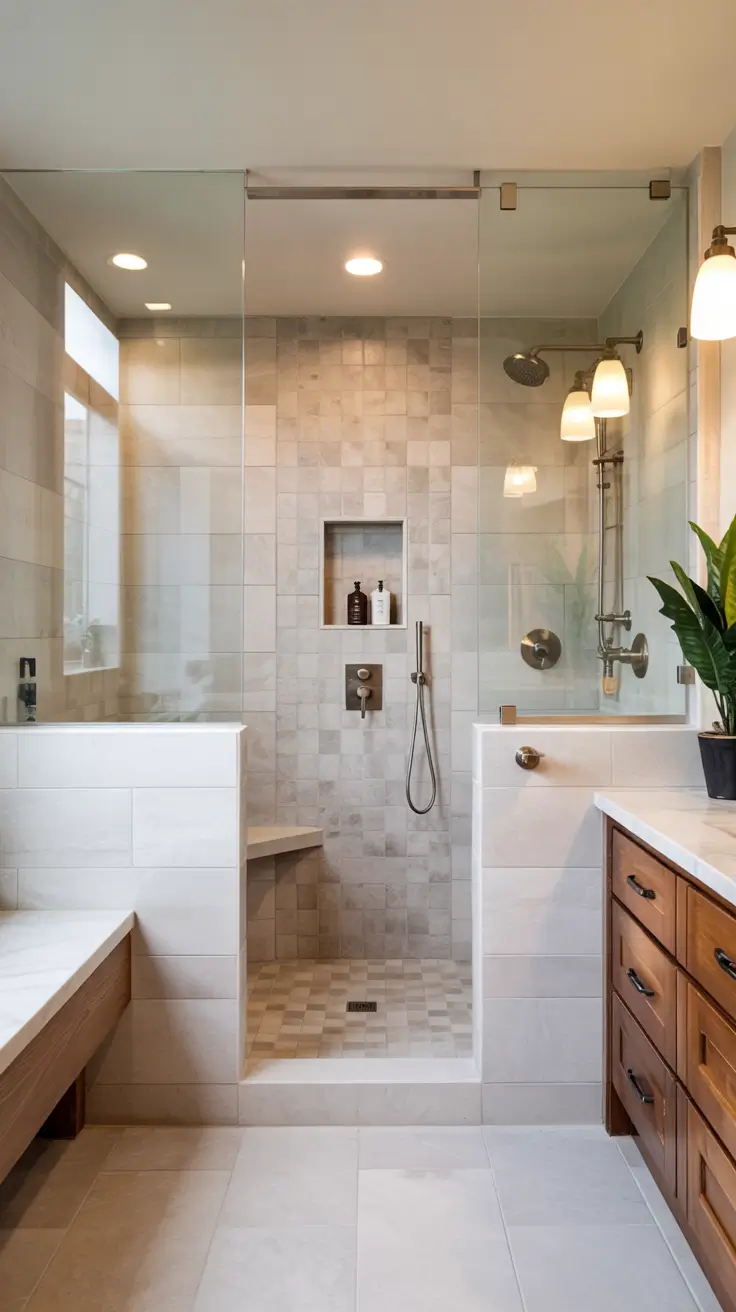
8. Shower Renovation With Tub For Flexible Bathing Options
When I design a shower renovation with tub, I treat it as a flexibility upgrade, not a compromise. The room reads calmer when the tub is set into a clean alcove or a simple deck, with the shower zone visually aligned to the vanity and mirror. I like keeping the wet area cohesive with one continuous floor material outside the tub apron, because it makes the whole bathroom feel larger. If the space allows, I plan a wider tub surround ledge for daily items so the room stays uncluttered. This approach works especially well when you want one bathroom to handle quick showers and long soaks without feeling crowded.
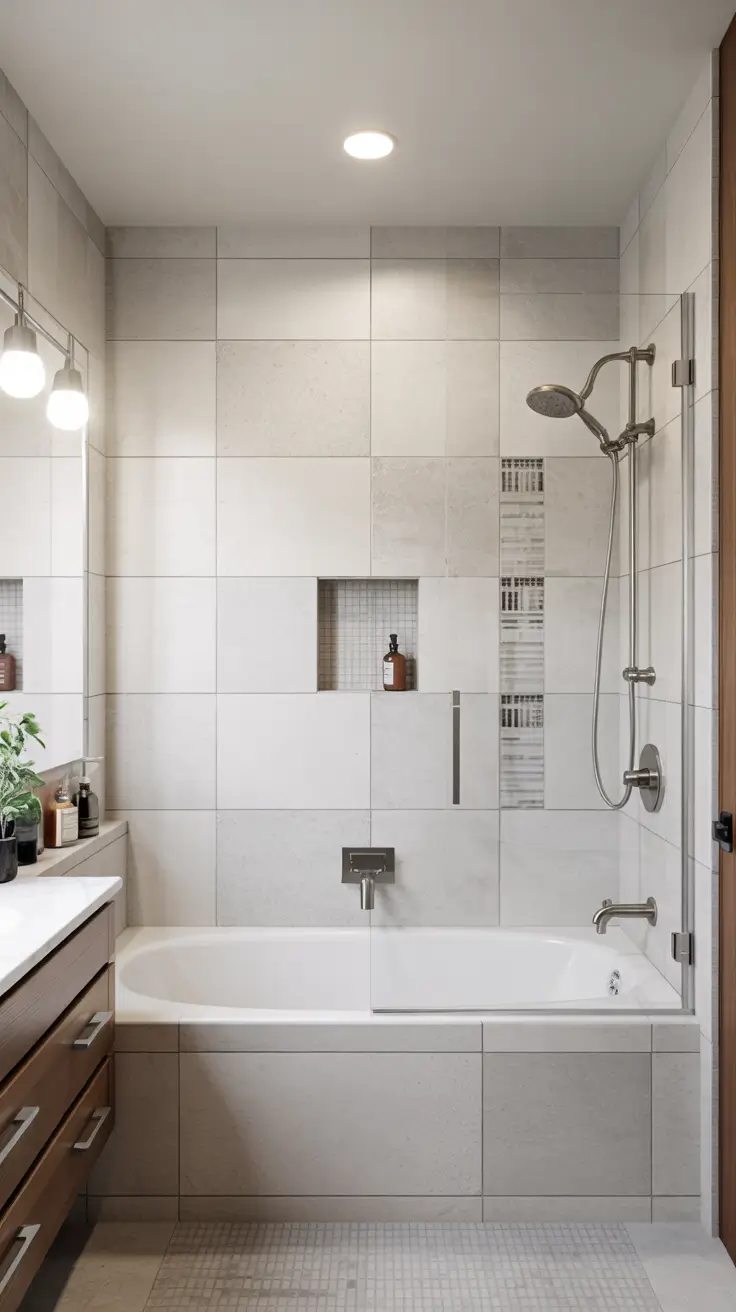
For materials, I prefer a durable tub with a comfortable back slope, plus a wall system that can handle constant moisture without drama. Shower renovation tile on the walls can look timeless here, but I keep grout lines under control by using larger formats and a calmer pattern. I nearly always include a glass panel or a simple sliding screen instead of a full curtain, because it reduces splashing and makes the room feel modern. A recessed niche at shoulder height is more useful than corner shelves, and I plan it where you can reach it from both the tub and the shower position. Good lighting matters, so I include a wet-rated recessed light over the tub plus a softer layer from vanity sconces.
From my experience, the biggest win is planning the plumbing and ergonomics early, because tub filler placement and showerhead location can fight each other if you guess. I also pay extra attention to slip resistance in the tub and on the bathroom floor, especially if the household includes kids or older family members. Many pros emphasize that waterproofing is a system, not a single product, and I agree completely because failures usually start behind the pretty surfaces. Even when the look is simple, I push for high-quality backer boards, membranes, and sealed transitions at the tub flange. That is what protects the investment and keeps the bathroom feeling new.
To complete this section in a real project, I would add a clear layout sketch with exact tub length, door swing, and clearance at the vanity. I would also add a ventilation plan, because tub showers create heavy humidity that needs steady exhaust. If the bathroom has a window, I would add details on moisture-safe trim and how to keep the sill easy to wipe down. Finally, I would add a simple finish schedule listing tile size, grout type, glass hardware finish, and the tub model so the design stays consistent during ordering.
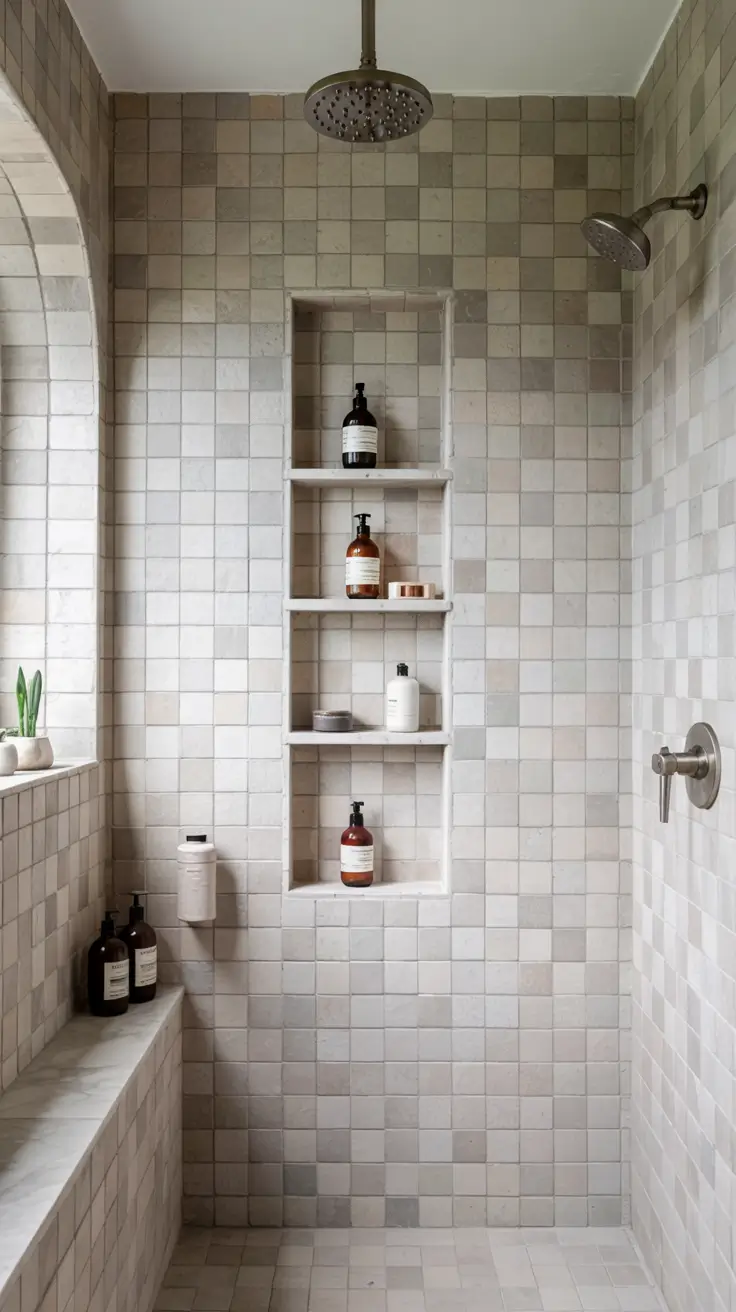
9. Shower Renovation Tile Ideas For Floors And Walls
Shower renovation tile is where most bathrooms get their personality, and I like using it to control both mood and maintenance. In 2026, the most successful tile rooms feel intentional but not busy, with fewer competing textures and cleaner transitions. I often build the whole room around one main tile family, then change scale or finish to create contrast between floors and walls. If the bathroom is small, a lighter palette and larger wall tile can make the room feel more open. If it is a master bath, deeper tones can look rich as long as the lighting is layered correctly.
On walls, I like large porcelain panels or large rectangle tile for a modern look with fewer grout lines. For the shower floor, I usually switch to small mosaic or a textured tile that follows the slope cleanly and improves traction. I keep niches framed in the same field tile so they look built-in rather than stuck on, and I align grout joints with key elements like the shower valve and the niche edges. Glass enclosures look best when the tile layout is precise, so I measure for the glass after tile thickness is confirmed. When clients want a bold moment, I use it on one back wall or in a vertical band, and I keep the rest simple so the bathroom does not feel dated fast.
My practical rule is that tile is only as good as the substrate and the slope under it. I always plan a proper pitch to the drain, and I avoid placing slippery polished tile on the shower floor even if it looks stunning in photos. Another thing I have learned is that grout color is a design decision, not an afterthought, because it can make the tile read calm or chaotic. I also consider long-term cleaning, so I prefer grout types and sealers that resist staining and do not demand constant upkeep. Those choices are what keep the shower renovation before and after difference looking good years later.
To strengthen this section, I would add guidance on selecting grout width, especially for large tile versus mosaic. I would also add a note on movement joints at corners and changes of plane, because that detail prevents cracking over time. If you are doing shower renovation diy, I would add a short checklist for waterproofing layers and flood testing before tile. Finally, I would add suggestions for coordinating tile with vanity tops and paint so the entire room feels cohesive.
10. Small Shower Remodel On A Budget For Compact Bathrooms
A small shower remodel on a budget works best when I focus on layout and visual simplicity instead of expensive materials. In compact bathrooms, the shower footprint and door swing often decide whether the room feels functional or frustrating. I like using a walk-in entry or a space-saving glass panel so the room looks less chopped up. Keeping the palette light and the lines straight makes a tiny room feel bigger without moving any walls. This is where shower renovation ideas on a budget can still look high-end if the details are clean.
For cost control, I pick one standout element and keep everything else standard and durable. A prefabricated shower pan can save money and reduce risk, while still allowing stylish wall finishes. If tile is in the plan, I choose affordable large-format porcelain for the walls, because it gives a modern look and reduces grout maintenance. I keep storage practical with one recessed niche and a slim bench only if the space truly allows it. For fixtures, a simple pressure-balanced valve, a handheld wand, and a good showerhead often deliver more daily comfort than fancy extras.
In my experience, the biggest budget mistake is overspending on visible finishes while underfunding waterproofing and ventilation. If I need to cut costs, I cut decorative pieces first and keep the system behind the walls solid. I also find that repainting, updating lighting, and switching to a clearer glass panel can deliver a surprisingly strong shower renovation before and after result. Many small bathrooms feel instantly newer when the grout lines are minimized and the clutter is reduced. That is why I plan where towels, toiletries, and hampers will live before I finalize the shower design.
To round out this section, I would add a mini budget breakdown for a cheap but durable approach, including where to allocate funds first. I would also add a list of measurements to confirm before ordering, like curb height, drain location, and the exact shower door opening. If the bathroom is extremely tight, I would add ideas like wall-mounted vanities and pocket doors that improve circulation. Finally, I would add a note on lighting temperature and mirror placement, because those details can make small bathroom renovations feel brighter without major construction.
11. Bathroom Renovations With Bathtub Shower Combo Solutions
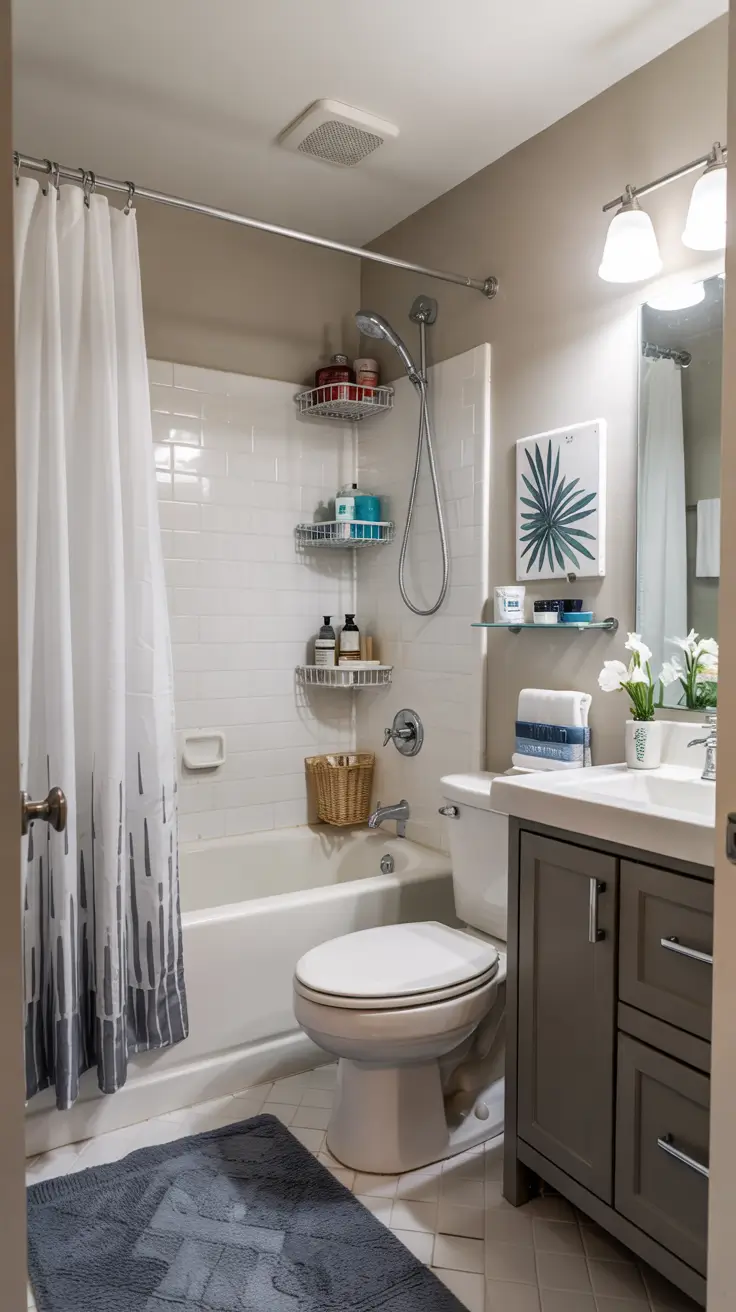
Bathroom renovations with bathtub shower combo layouts are ideal when one bathroom needs to serve many routines. I like them for family homes, guest baths, and multi-use spaces where bathing kids or washing pets is part of real life. The design goal is to make the combo feel intentional, with a clear wet zone and surfaces that are easy to clean. I often use a full-height wall treatment that visually frames the tub and unifies the shower area. When the bathroom is narrow, I keep the surround crisp and avoid bulky ledges that steal elbow room.
For the surround, I choose either tile or high-quality wall panels that resist moisture and soap buildup. I like a clean niche layout, a simple bench only if space allows, and a showerhead plus handheld combo to make the tub practical. A fixed glass panel or a sliding glass door can make the room look more modern than a curtain, and it usually improves splash control. If the household wants warmer comfort, I plan for a small radiant mat outside the tub, because stepping onto a warm floor changes the whole experience. I also coordinate the tub drain, faucet finish, and lighting so the room reads cohesive.
In my opinion, the best combo bathrooms avoid looking like a purely utilitarian setup by treating the wall design like a feature. A subtle vertical tile stack or a calm stone look can add style without adding complexity. I also pay attention to the tub height and the curb, because accessibility matters more than people expect. If someone in the home might need an easier step-in later, I plan grab bar blocking and a layout that can adapt. Those small planning choices make shower renovations smarter, not just prettier.
To complete this section, I would add advice on choosing between a standard tub, a deeper soaking tub, and a lower step-in option. I would also add notes on fan capacity and humidity control, because combo setups create a lot of steam and spray. If you have a window near the tub, I would add guidance on privacy glass and moisture-safe blinds. Finally, I would add a quick checklist for durable trim, caulk lines, and maintenance routines so the combo stays looking clean.
12. Master Shower Renovation Ideas For Luxury Living
Master shower renovation ideas in 2026 lean toward spa comfort, quiet visuals, and space that feels easy to use every day. When I plan a master shower, I want the room to feel like a retreat without relying on fussy details. A walk-in layout with a clear glass enclosure can make the whole bathroom feel bigger and brighter. I like creating a focal wall behind the shower with refined texture, then keeping the rest of the room calm so it does not feel overdesigned. If there is room, I also plan a seating area or a dry zone that makes the space feel like a suite.
For luxury features, I focus on things you feel, not just things you see. A larger shower footprint, a well-placed bench, and a handheld wand are daily comfort upgrades. If the household enjoys it, a steam option can be amazing, but I treat it as a full system with proper sealing, a sloped ceiling, and dedicated ventilation planning. I also like double vanity lighting paired with a dimmable overhead layer so the room adapts to morning and evening routines. Storage matters in master bathrooms, so I include niches, a tall cabinet, and a place for towels that stays outside the splash zone.
From my experience, the difference between a nice shower and a truly luxurious one is how well it is planned for noise, temperature, and cleaning. I like thermostatic controls when the budget allows, because stable water temperature feels premium immediately. I also avoid too many grout lines in a master shower, because maintenance can ruin the spa feeling over time. If the space has a shower renovation with window opportunity, I plan it carefully with moisture-safe details so the light feels like a feature rather than a risk. A master shower should feel effortless to maintain, or the luxury disappears fast.
To strengthen this section, I would add a clear pathway plan showing where you step in, where towels hang, and where the dry storage sits. I would also add recommendations for glass thickness, door swing clearances, and anti-lime coatings if your water is hard. If steam is included, I would add details on the generator location and safe electrical planning. Finally, I would add a finish palette example for a modern master look, including tile, metal finish, paint tone, and lighting style.
13. Modern Shower Renovation Ideas With Clean Lines
Modern shower renovation ideas are all about restraint, proportion, and materials that look calm in the full room view. I like a modern bathroom when the lines are continuous, the transitions are minimal, and every element feels placed with intention. A frameless glass enclosure, a linear drain, and large tiles can make the shower look architectural without feeling cold. I often keep the color palette neutral, then bring warmth through wood tones, lighting, or textured accessories. This style works in small bathroom spaces and larger suites because it is based on clarity.
In terms of choices, I keep fixtures streamlined and choose a cohesive finish across the room. Wall-mounted controls and a simple rain head can look great, but I also include a handheld for real-life usefulness. I like floating vanities or slimmer profiles to keep the floor visible, which makes the entire bathroom feel more open. Storage is hidden or integrated, so I use recessed niches, a medicine cabinet mirror, and minimal open shelving. For lighting, I choose a clean ceiling layer plus mirror lighting, because modern rooms look best when shadows are controlled.
My personal test for modern design is whether the room still feels calming when you add daily items like shampoo, towels, and skincare. If everything has a place, the design stays modern instead of messy. I also find that modern rooms benefit from one tactile feature, like a softly ribbed tile or a matte stone look, so they do not feel flat. Even in a shower renovation on a budget, you can get a modern effect by simplifying the layout and reducing visual clutter. Modern is not about expensive, it is about deliberate.
To complete this section, I would add a short guide on selecting glass hardware and drain styles that match the clean-line look. I would also add tips for hiding outlets, cords, and switches so the walls stay visually quiet. If you are planning shower renovation diy, I would add advice on keeping tile alignment and level lines precise, because modern design exposes mistakes quickly. Finally, I would add a simple list of modern-friendly materials, like large porcelain, microcement looks, and matte finishes that hide water spots better.
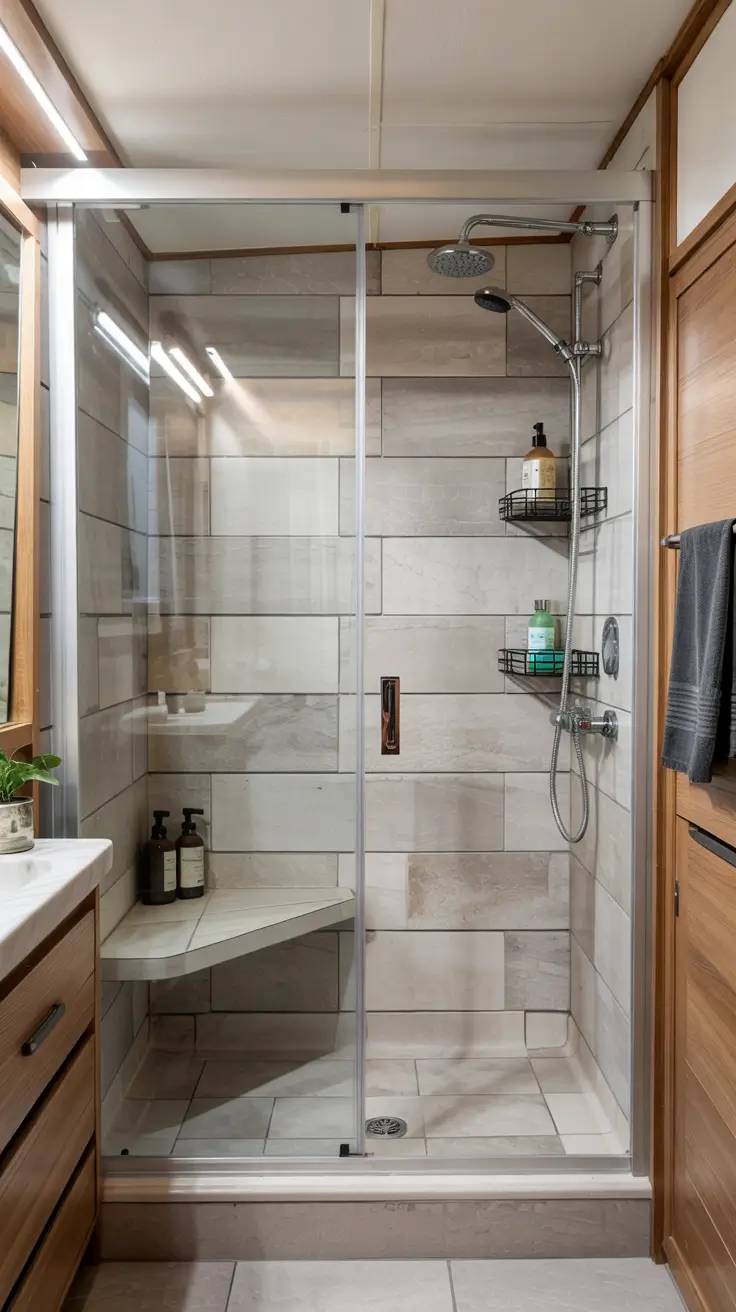
14. Stand Up Shower Renovation Ideas For Small Spaces
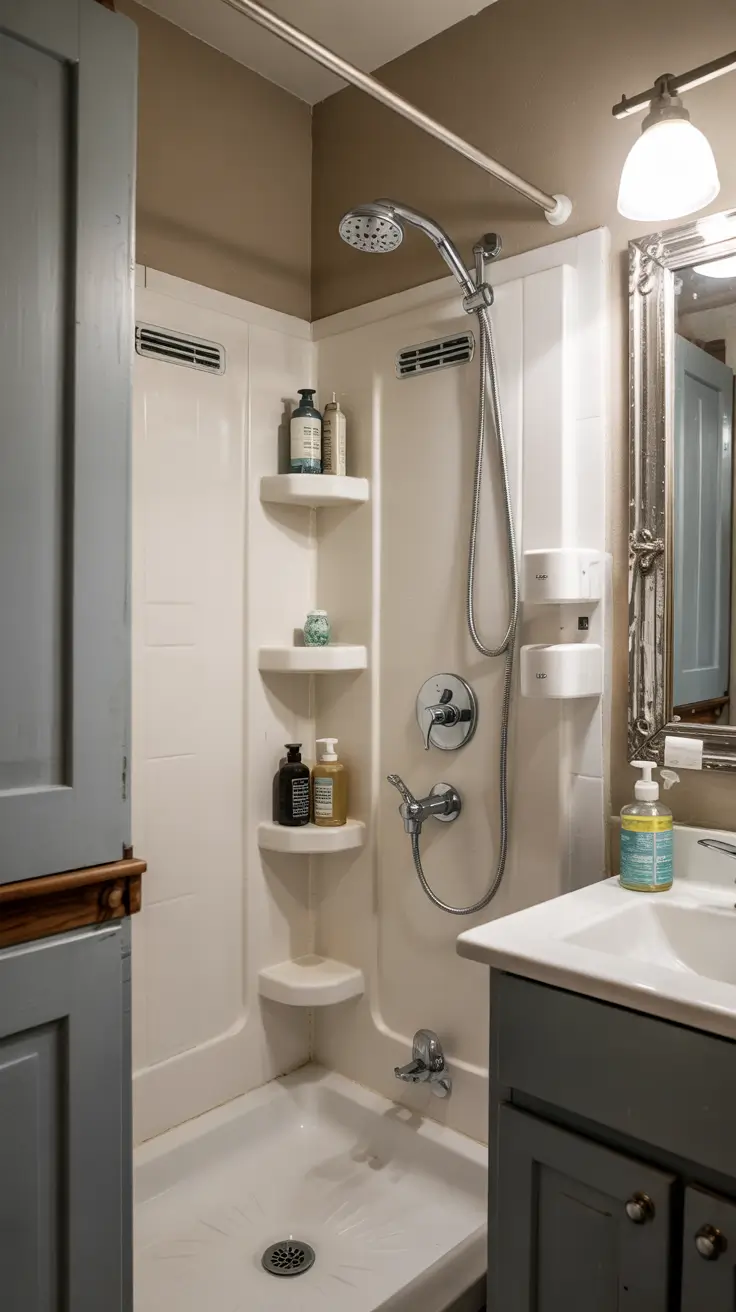
Stand up shower renovation ideas are perfect when you want to reclaim floor area and make a small bathroom feel less cramped. I like a stand-up shower when it is sized correctly, because even a compact footprint can feel comfortable if the entry and sightlines are handled well. A clear glass panel or door keeps the room feeling open, and a curbless or low-threshold entry can make the layout feel smoother. This is one of the best directions for shower renovation ideas in tight apartments, tiny homes, and even rv or camper bathrooms where every inch matters. With the right choices, the shower becomes a clean, modern anchor for the entire room.
For small spaces, I use space-efficient features that add function without bulk. A corner or linear drain helps keep the floor slope tidy, and a narrow niche keeps bottles off the floor. I like a compact bench or footrest only if it does not block movement, because standing comfort matters more than extra surfaces. For walls, a simple large tile or panel finish reduces busy lines and makes the shower feel larger. If the bathroom must stay cheap, a solid shower base and a clean wall system can still look high-end with good lighting and minimal hardware.
In my experience, small showers succeed when water control is taken seriously. I choose a showerhead that does not spray too wide, and I place it so water stays inside the wet zone. I also prioritize ventilation, because small rooms get humid fast and that affects everything from paint to mirrors. If you want small shower remodel on a budget bathroom renovations to feel more premium, focus on a quiet color palette, a better showerhead, and a clearer glass panel. Those choices create a noticeable shower renovation before and after difference without needing a bigger footprint.
To finish this section, I would add a sizing guide for minimum comfortable shower dimensions and door clearances. I would also add tips for choosing anti-slip flooring and easy-clean wall finishes that suit small spaces. If the bathroom has a window, I would add specific details on window placement relative to splash zones and how to protect trim. Finally, I would add a quick note for shower renovation diy planning, like confirming stud locations for future grab bars and ensuring the drain and slope are set correctly before finishes go in.
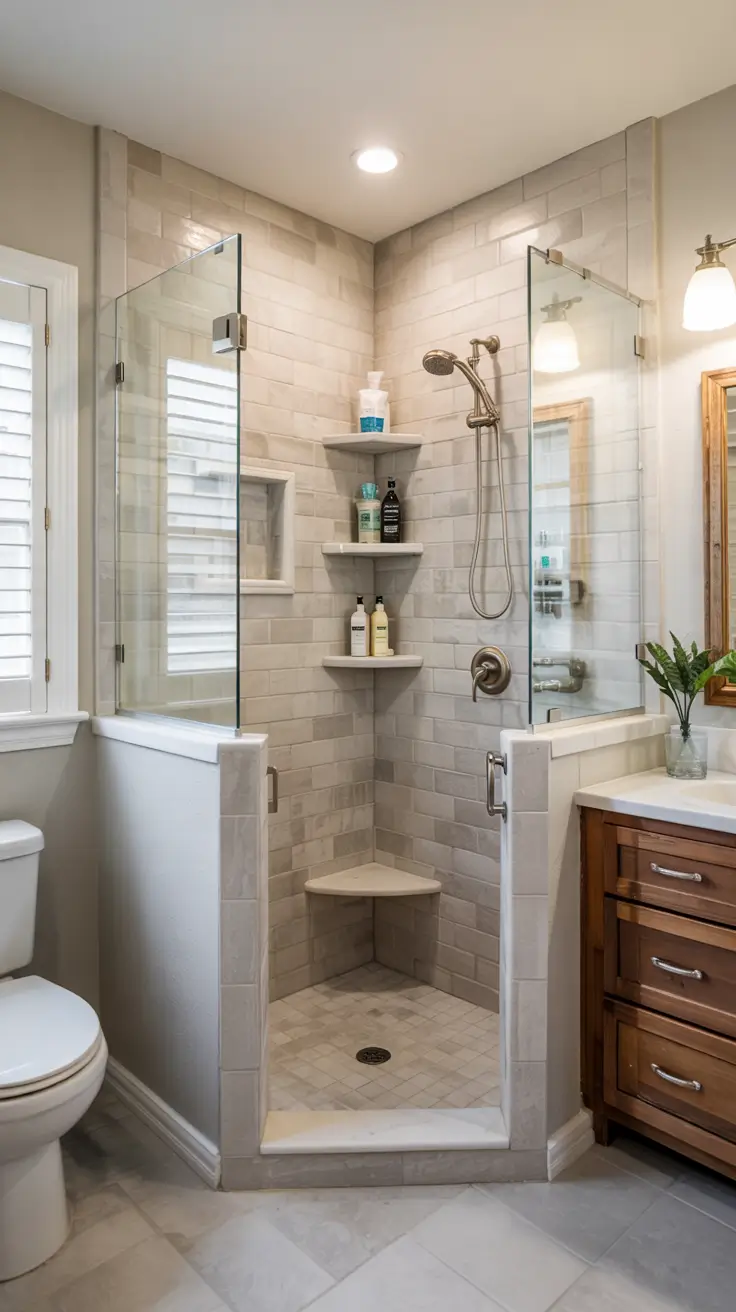
15. Walk In Shower Renovation Ideas For Easy Access
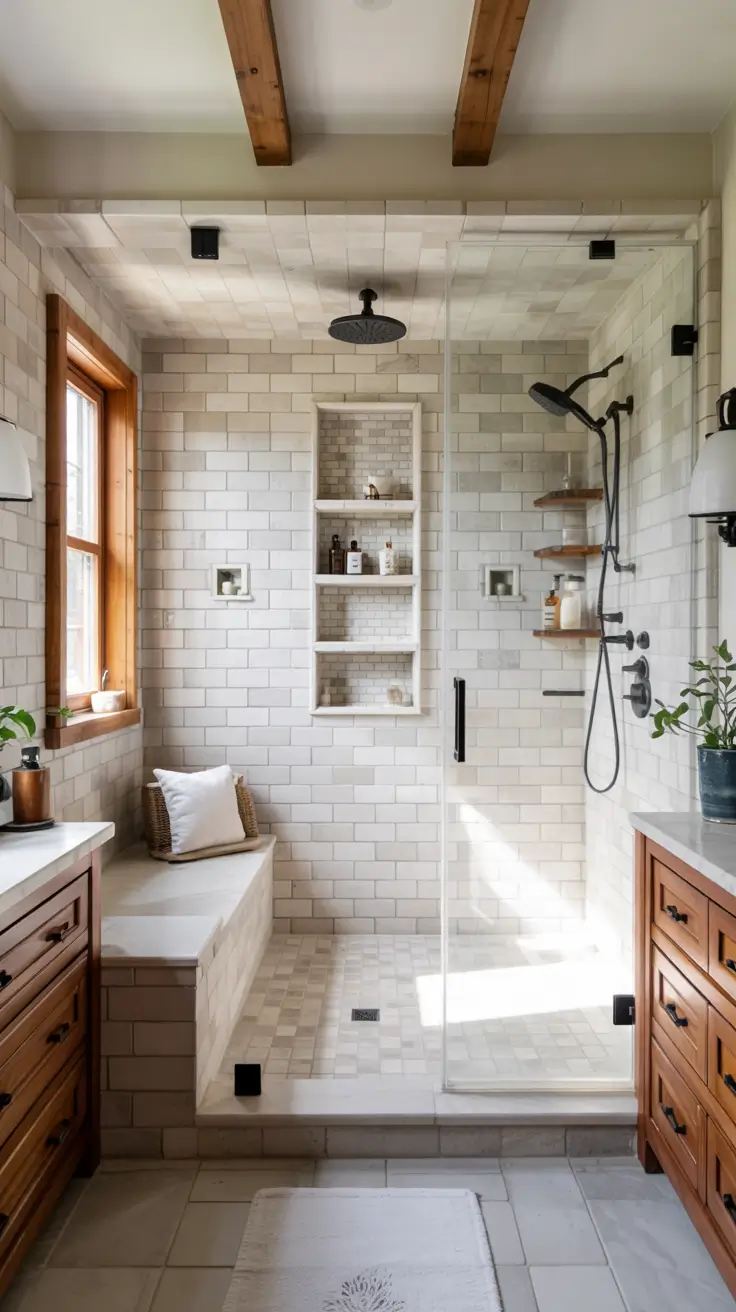
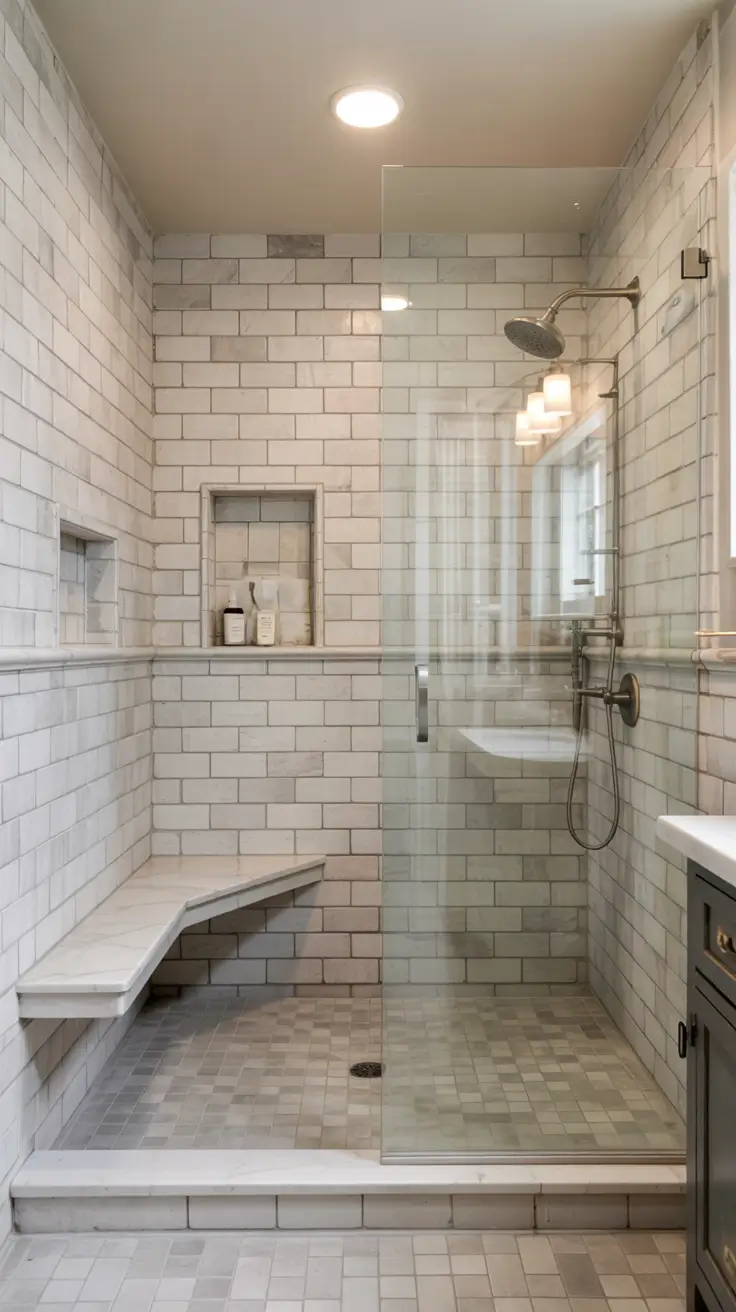
A walk in layout is one of the most practical shower renovation ideas because it improves comfort and circulation without demanding a huge footprint. I usually aim for a clear entry path, a stable floor slope, and a drain plan that keeps water where it belongs. The best versions feel open but still control splash, often with a partial glass panel or a deeper entry return wall. If the bathroom has enough width, I like to create a longer shower zone so the wet area stays away from the doorway. This approach also pairs well with master shower renovation ideas where you want a calm, spa-like routine that does not feel cramped.
For the design elements, I prefer a built-in bench or a simple floating seat, plus a recessed niche at shoulder height for bottles. A handheld shower on a slide bar is a small detail that makes daily use easier for kids, guests, and cleaning. I also recommend a linear drain when the layout allows it, because it can simplify the tile slope and make the floor look more seamless. For storage, I add two hooks outside the wet zone for towels and a robe so the room stays tidy. When people want a bath to shower change, a walk in plan often gives the cleanest, most updated result with fewer awkward corners.
From experience, the biggest upgrade is not the open entry itself, but how well the water management is handled. I have seen beautiful walk in showers fail because the curb-free look was prioritized over proper slope and splash planning. Many pros emphasize that waterproofing is a system, not a single product, and I treat it that way by specifying membrane coverage, corner reinforcement, and careful transitions. When I do shower renovations, I also check ventilation early, because humidity control protects grout, paint, and cabinetry. If you want a true shower renovation before and after difference, focus on the invisible layers first, then finish materials.
To complete this section, I would add exact dimensions that fit your room, like recommended clear entry width and bench depth, based on your floor plan. I would also include a short checklist for the shower pan, drain location, and waterproofing inspection points before tile goes in. If you plan to age in place, I would add blocking for future grab bars even if you do not install them now. Finally, I would include lighting notes, because a walk in shower needs balanced task light without glare.
16. Glass Shower Renovation Ideas For Open Visual Space
Glass enclosures are my go-to solution when a bathroom needs to feel bigger without moving walls. Clear glass keeps sightlines open, which is especially helpful in a small bathroom where visual clutter makes everything feel tight. In 2026, I see more people choosing minimal hardware and larger panels, which creates a calmer, more architectural look. The key is to balance openness with privacy and water control, so the shower stays comfortable to use. This is also a smart direction for shower renovation with window layouts, because glass lets daylight travel through the whole room.
For materials and layout, I typically use fixed panels with a hinged door only when necessary, because fewer moving parts age better. I like to pair the glass with a quiet wall tile and a slightly different shower floor tile for grip and subtle contrast. If the budget allows, I specify easy-clean coatings and solid bracing so the enclosure feels stable, not flimsy. A slim curb can still look modern, and it often prevents drips better than a fully curb-less setup in compact rooms. I also plan the towel bar placement carefully so the shower zone stays dry and the glass stays cleaner.
My practical advice is to think about maintenance as part of the design, not an afterthought. Glass looks incredible in a shower renovation before and after reveal, but it needs a plan for squeegee storage, ventilation, and water quality issues like spotting. I have had the best long-term results when I combine a strong exhaust fan, a small daily wipe routine, and finishes that do not show every drop. Many designers also recommend choosing fixtures that match your water hardness reality, like brushed finishes over high-polish, and I agree. If you want the open look without constant work, details like coating, drainage, and airflow matter as much as the glass itself.
To finish this section, I would add guidance on glass thickness, door swing clearance, and the safest places to use frameless panels. I would also include a quick comparison of clear versus fluted or lightly frosted glass for privacy. If your shower renovation ideas on a budget are tight, I would add alternatives like a single fixed panel instead of a full enclosure. Finally, I would add notes on lighting reflection, because glass can bounce light beautifully or create glare if the fixtures are poorly placed.
17. Standing Shower Renovation Ideas For Minimalist Bathrooms
A standing, stand up shower is ideal when you want a clean, efficient footprint and a minimalist vibe. I often recommend it for bathrooms that are used daily and need to feel simple, not overdesigned. The best minimalist showers rely on strong geometry, consistent materials, and smart storage that disappears into the wall. This style works well for modern renovations because it highlights calm surfaces and reduces visual noise. It is also a great option for shower renovation diy planning because you can simplify choices and focus on essentials.
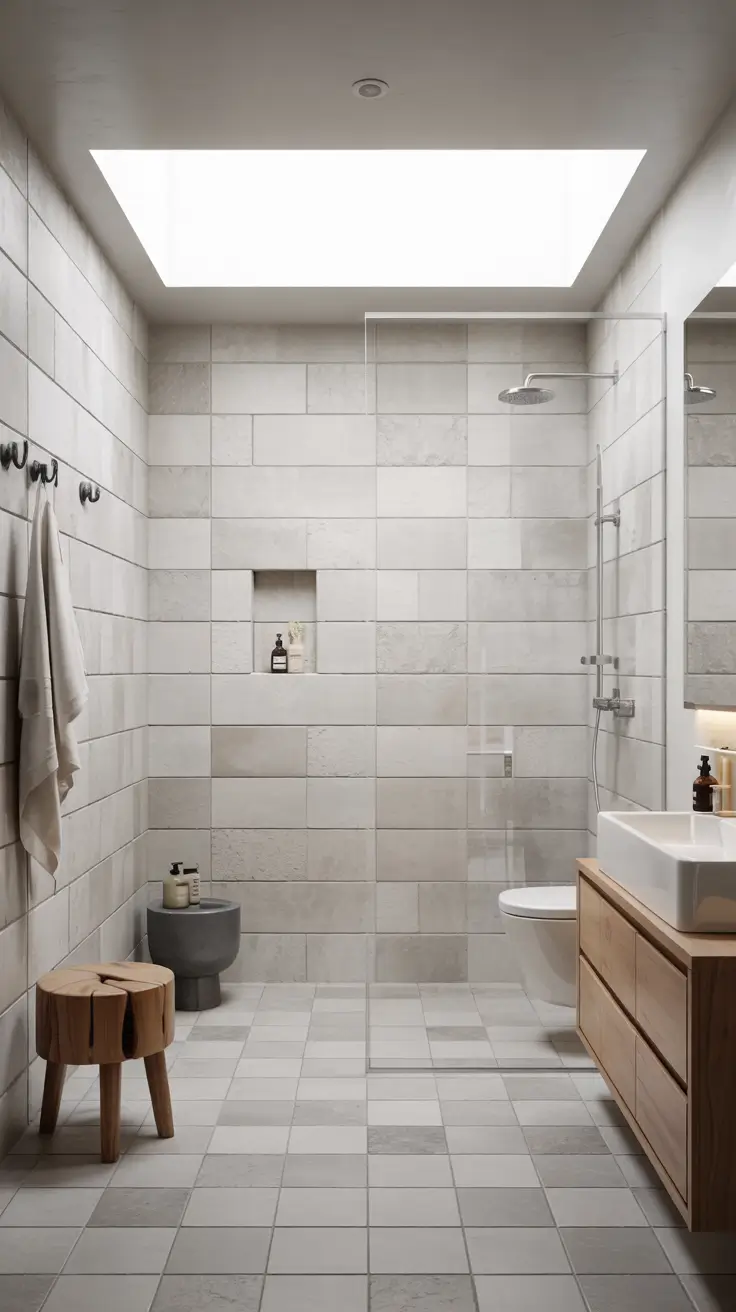
For the core design pieces, I usually choose large-format wall tile to reduce grout lines, then add one niche or a slim shelf that aligns with the grout pattern. A single rain head plus a handheld gives flexibility without adding clutter, and I keep valve trims minimal. I like floating vanities and wall-mounted toilets nearby when possible, because they reinforce the light, airy look. In a minimalist bathroom, even small accessories matter, so I use matching hooks, a simple teak stool, and neutral towels to keep the palette cohesive. If the room includes a tv in the bathroom area, I plan it outside the wet zone with glare control so it feels integrated, not random.
In my experience, minimalist design succeeds when the proportions and alignment are precise. I have seen people spend on premium fixtures but lose the effect because niches, grout lines, and lighting do not line up. For shower renovations, I sketch the tile grid early and decide exactly where the valve, niche, and shower head will land. Many pros stress that good lighting is what makes minimalist surfaces look rich, and I agree, especially with soft layered light rather than one harsh ceiling fixture. A simple shower renovation on a budget can still feel high-end if it is well-aligned and thoughtfully lit.
To complete this section, I would add a small material palette example, such as warm white tile, light oak vanity, and brushed metal fixtures. I would also include tips for sound and comfort, like adding a quiet fan and a soft mat outside the shower. If your water pressure is inconsistent, I would add guidance on selecting shower heads that perform well in your home. Finally, I would add notes on grout color selection, because it can make minimalist tile look seamless or busy.
18. Tile Shower Renovation Ideas With Pattern And Texture
Tile is where I can create the most personality in shower renovation tile projects without changing the plumbing footprint. Pattern and texture add depth, and they are especially useful when the rest of the bathroom is simple. I like to use tile to guide the eye, such as a vertical stack to lift the ceiling visually or a horizontal pattern to widen a narrow wall. In 2026, I see more tactile surfaces like handmade-look ceramic, ribbed tile, and stone-inspired textures that read warm rather than cold. A strong tile plan can make shower renovation before and after photos look dramatic even if the layout stays the same.
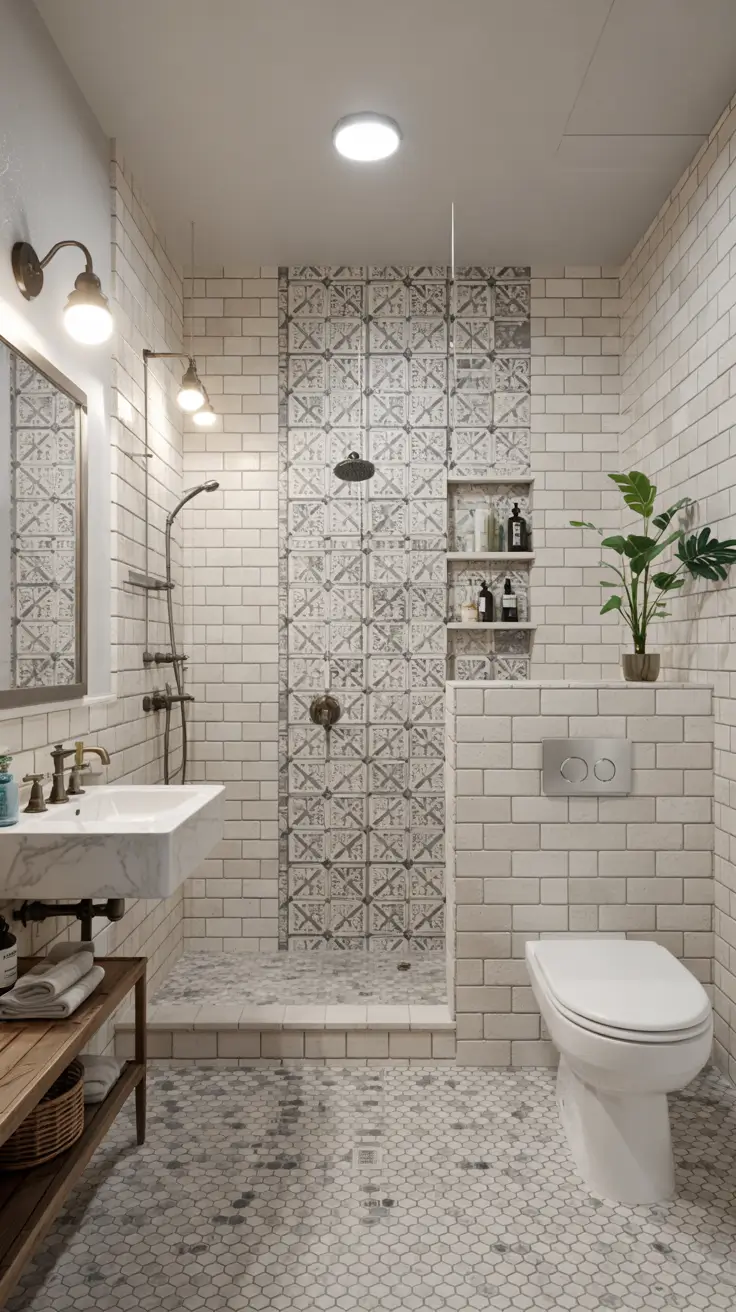
For a practical build, I pair a statement tile with calmer supporting materials so the room does not feel overwhelming. For example, I might use a bold pattern on one wall, then a quiet large tile on the other walls and a slip-resistant mosaic on the floor. I also like to extend the tile to the ceiling in many shower renovations because it looks custom and improves moisture protection. If the bathroom renovations with bathtub shower combo layout stays in place, a patterned tile band can visually separate the shower zone from the tub area. I always choose grout colors intentionally, because the grout can either highlight the pattern or let the surface read more continuous.
My professional tip is to design tile like a composition, not a catalog selection. I plan where the focal point is, how the pattern lands at corners, and where cuts will be most visible. I have also learned to balance texture with cleanability, because heavily grooved tile can hold soap residue if the water quality is hard. Many interior design sources emphasize using fewer, stronger materials rather than too many competing surfaces, and that approach makes tile feel more expensive. If you want shower renovation ideas on a budget, investing in one focal tile and keeping everything else simple is often the smartest visual move.
To round out this section, I would add specific examples of pattern layouts, like herringbone accent wall, vertical kit-kat strips, or a checkerboard-inspired floor. I would also include a short note on sealing requirements for natural stone and cementitious grout. If you are doing shower renovation diy work, I would add a caution about substrate flatness, because textured and patterned tile shows uneven walls quickly. Finally, I would add advice on mixing metals and tile undertones so the finishes look intentional.
19. Double Shower Renovation Ideas For Shared Bathrooms
A double shower can be a genuine quality-of-life upgrade when two people share the same schedule. The goal is not just two shower heads, but a layout that prevents bumping elbows and keeps storage accessible for both users. I usually plan for more width, better ventilation, and stronger water management because the shower will be used more intensely. This is one of the master shower renovation ideas that feels luxurious, but it also needs careful planning to stay practical. When done right, it can also raise the sense of order in the entire bathroom.
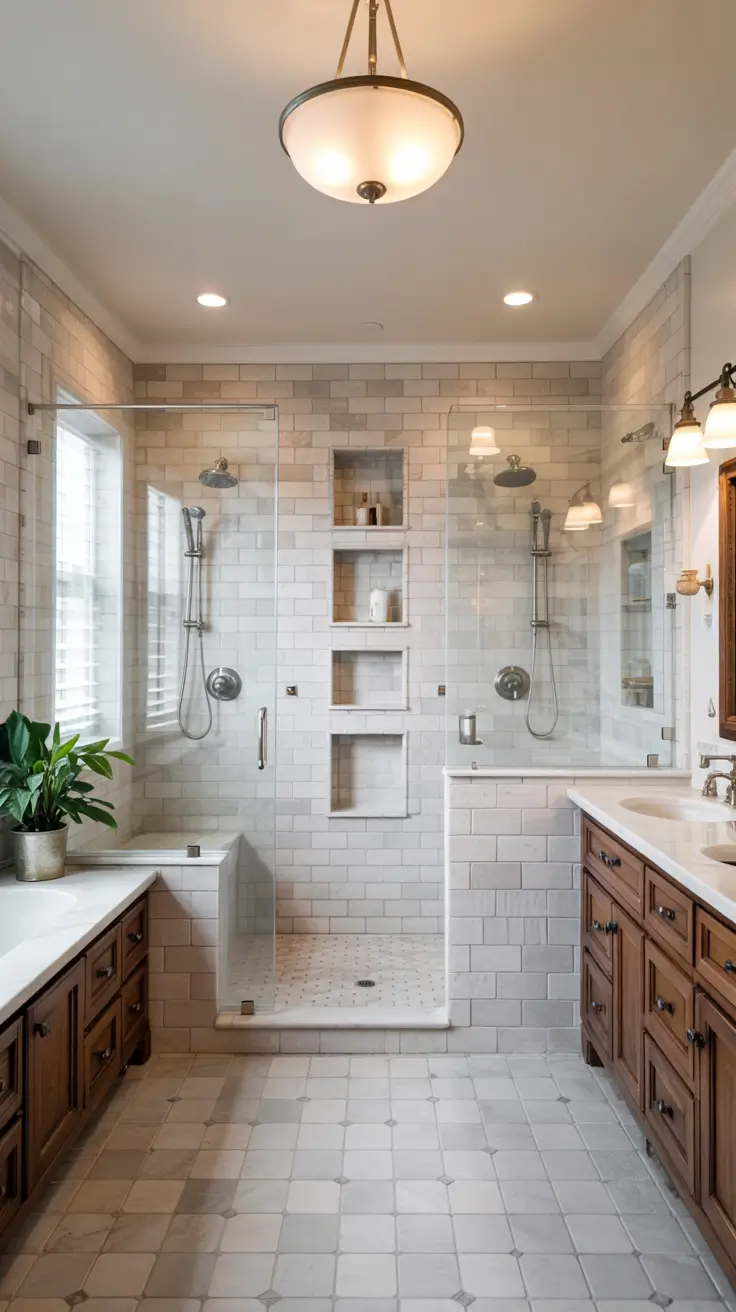
For fixtures and layout, I like two separate controls so each person can set temperature without affecting the other. I also recommend two niches or a longer niche with divided zones so products do not pile up. A longer bench or two small corner seats can work well, depending on space, and I keep the floor tile extra slip-resistant. If the room allows, I prefer a walk-in entry with a partial glass return, because it keeps the space open while limiting splash. When people also want shower renovation with tub nearby, I plan the wet zone boundaries carefully so the tub area stays comfortable and dry.
My advice is to confirm your water heater capacity and plumbing constraints before committing to a double setup. I have seen double showers disappoint when the hot water runs out quickly or pressure drops when both heads are on. Many pros recommend pressure-balancing or thermostatic valves for comfort and safety, and I treat those as foundational choices in shared bathrooms. If the goal is a shower renovation on a budget, you can still achieve the double feel by using one main head plus two handhelds and alternating use. The best shower renovations respect the home’s systems, not just the floor plan.
To complete this section, I would add planning notes for minimum comfortable dimensions and the best locations for drains in larger showers. I would also include a checklist for sound control, because shared showers can be noisy in open-plan suites. If your bathroom includes a window, I would add privacy and moisture notes, since double showers often sit on exterior walls. Finally, I would add storage ideas outside the shower, like double towel hooks and separate drawers, to keep the shared routine smooth.
20. Cheap Shower Renovation Ideas That Still Look Premium
A cheap refresh can still look premium if you focus on visual impact and avoid changes that trigger major labor. In many shower renovation ideas on a budget plans, I prioritize keeping plumbing locations, upgrading the surround, and improving lighting and hardware. A well-chosen tile, a clean glass panel, and modern fixtures can create that high-end feel without a full rebuild. I also pay attention to what the eye notices first, like grout condition, caulk lines, and trim alignment. When the basics look crisp, the whole bathroom reads more expensive.
For the most effective updates, I often recommend reglazing or refreshing the base when it is structurally sound, then replacing the shower head, valve trim, and drain cover with matching finishes. A new niche insert or a slim corner shelf can add function without heavy construction. If full tile replacement is not possible, large-format shower wall panels can look sleek and reduce maintenance. For small shower remodel on a budget bathroom renovations, I like to add one design focal point, like a patterned floor tile, and keep the walls simple. If your space is an rv, camper, or caravan, lightweight panels, compact fixtures, and good sealants are essential to keep the renovation durable on the move.
In my experience, the biggest mistake in budget work is skipping prep and waterproofing details. A budget shower renovation diy plan should still include proper substrate repair, mold-resistant materials, and careful sealing at all transitions. Many home improvement pros repeat that money saved on hidden structure can cost you later, and I have seen that play out with leaks behind beautiful finishes. I also recommend spending a little more on the right fan and lighting, because those upgrades protect the room and make everything look better. If you want premium results, treat cleanliness, alignment, and moisture control as the luxury features.
To finish this section, I would add a simple priority list of upgrades, ranked by impact per dollar. I would also include a short guide on choosing budget-friendly finishes that do not look cheap, like matte ceramics and brushed metals. If you are renovating a tub and shower combo, I would add advice on updating the surround while keeping the bathtub. Finally, I would add a quick note on paint and trim in the rest of the bathroom, because surrounding finishes affect how premium the shower looks.
21. Tiny Shower Renovation Ideas For Ultra Small Bathrooms
Tiny showers can be surprisingly comfortable when the layout is planned with intention. In an ultra small bathroom, I focus on making the shower feel light, bright, and easy to maintain, because every surface is close to you. I often use clear glass or a single fixed panel to keep the room from feeling chopped up. Storage needs to be built-in and vertical, so bottles do not end up on the floor. This is where smart shower renovations shine, because small changes can transform daily use.
For fixtures and furniture choices, I like compact valves, a handheld shower, and a niche that is tall enough for full-size bottles. I usually choose light-colored tile with subtle texture, because it reflects light and hides water marks better than high-gloss. If there is a shower renovation with window opportunity, I use moisture-safe window treatments and ensure the sill and trim are properly protected. In bathrooms with bathtub shower combo constraints, I sometimes recommend a bath to shower conversion to reclaim floor space, but only if the household does not rely on a bathtub. For the tightest rooms, I plan a pocket door or an outswing door if possible, because it can change how the bathroom feels more than any finish.
My advice is to design tiny showers around movement and reach. I test where your elbows will be, where the towel will hang, and whether the door swing blocks your path. I have learned that tiny rooms feel better with fewer materials and one consistent palette, because it reduces visual noise. Many designers recommend using larger mirrors and layered lighting to expand the sense of space, and that is especially true here. If you are aiming for shower renovation ideas on a budget, choose simple tile, invest in good lighting, and keep the layout clean.
To complete this section, I would add a set of recommended minimum clearances, such as comfortable shower width and niche placement height. I would also include tips for slip resistance and fast drying, like floor tile selection and fan sizing. If your home has limited hot water or pressure, I would add fixture suggestions that still feel satisfying. Finally, I would add organization ideas right outside the shower, like a narrow tower cabinet or hooks, because tiny bathrooms need support space.
22. Simple Shower Renovation Ideas With Timeless Appeal
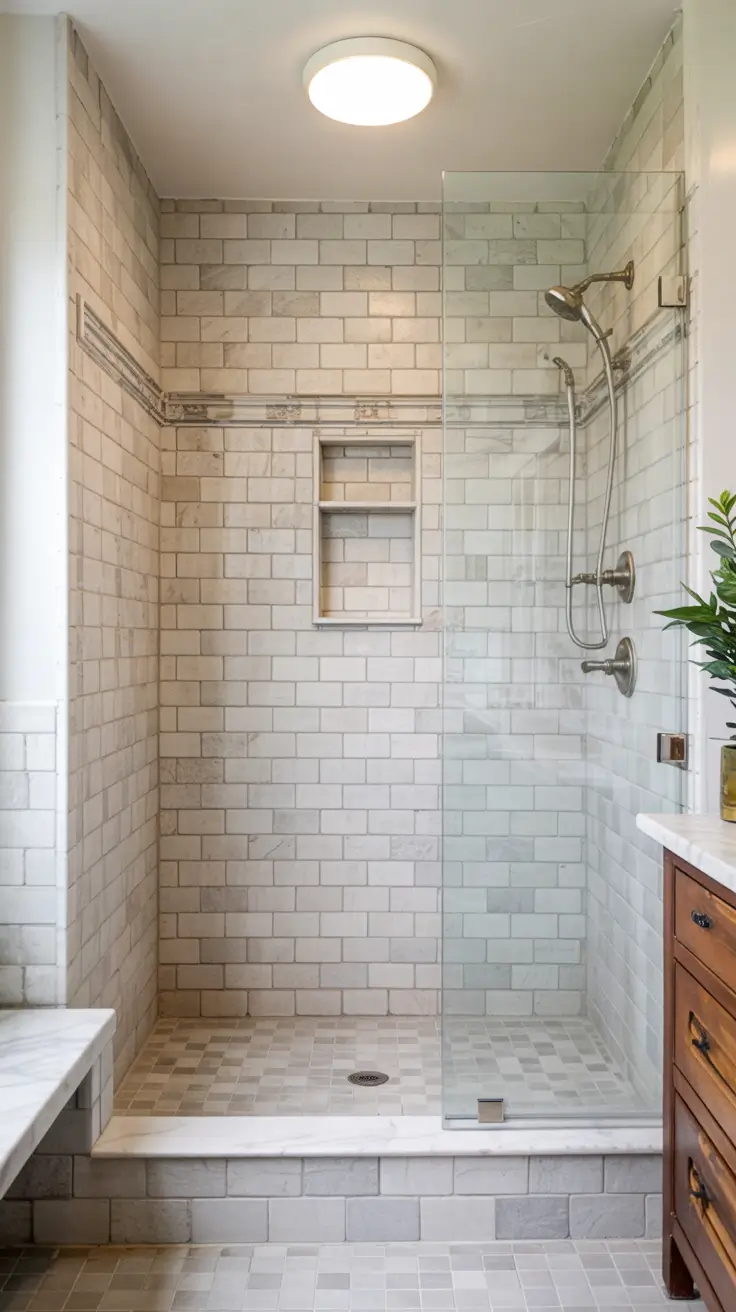
I like starting with a timeless baseline because it makes future updates easier and keeps resale friendly. A simple walk in shower with clean lines, balanced proportions, and calm materials reads modern without feeling trendy. I usually pick one hero surface, like shower renovation tile in a classic format, and then keep everything else quiet. The goal is a space that looks intentional in the full room view, not just in a closeup of the niche. If you want shower renovation ideas that age well, simplicity is the safest bet.
For materials, I lean on matte porcelain tile, a clear glass panel, and brushed nickel or chrome fixtures for a crisp finish. A built in niche at chest height, a slim floating bench, and a linear drain can add function without visual noise. I also like a recessed ceiling light paired with a warm vanity sconce so the shower corner does not feel shadowy. If the bathroom is small, I keep the curb minimal or go curbless where feasible to make the footprint feel larger. These choices make the room look cohesive even if the vanity and flooring stay the same.
In my experience, the best shower renovation before and after transformations come from improving layout clarity rather than adding fancy features. I have seen classic subway tile look premium when grout lines are tight and edges are finished with clean trim. Many designers repeat the same advice in different words: edit hard, and let quality show through detailing. I also recommend choosing one metal finish and sticking to it across the shower, vanity, and accessories. That consistency reads expensive even when the budget is not.
What I would still add to complete this concept is a tight accessory plan. I would specify two towel hooks near the shower exit, a dedicated spot for a bath mat to dry, and a small teak stool if there is no bench. I would also add a fog resistant mirror and a quiet exhaust fan so the space stays comfortable long term. If the wall color is undecided, I would keep it soft and warm so the tile does not look cold. Those small decisions make the simple design feel finished.
23. Steam Shower Renovation Ideas For Spa Like Comfort
A steam shower can turn an everyday bathroom into a true recovery space, especially in colder months. I treat this as a comfort project first, so the enclosure needs to hold heat and feel calm in the full room view. The most important move is creating a sealed environment with a proper door, transom or tight header detail, and surfaces that tolerate moisture. I also think about how the steam experience starts before you step in, with lighting, a place to set a robe, and a clear path from vanity to shower. Among master shower renovation ideas, steam is one of the most indulgent upgrades that still feels practical.

Inside the enclosure, I like large format tile to reduce grout lines, plus a sloped ceiling so condensation does not drip straight down. A built in bench is non negotiable for comfort, and I prefer it as a full width slab with a slightly rounded front edge. Add a steam generator sized for the volume, a steam head positioned away from the bench, and a thermostatic valve for stable temperature. For a modern touch, I often add a dimmable downlight rated for wet locations and a small niche for aromatherapy. If you want a subtle tech upgrade, a simple shower system controller keeps controls neat without turning the room into a gadget display.
From what I have seen, steam showers succeed when you plan maintenance like you plan style. I always advise choosing tile and grout products that handle frequent moisture, and using a squeegee daily to reduce buildup. A common professional recommendation is to prioritize ventilation and proper waterproofing because steam is unforgiving if corners are cut. I also like to keep the hardware minimal so cleaning is easier. When done right, this is one of those shower renovations that feels luxurious every single day.
To complete this section, I would add a comfort layer outside the shower. I would include a towel warmer or a heated hook, a small bench or chair near the shower, and a soft, warm lighting scene for evenings. I would also specify a quiet but strong exhaust fan with a timer, because steam needs a fast exit after use. If the budget allows, radiant floor heat makes the spa feeling consistent across the whole bathroom. Those additions help the steam feature feel integrated rather than isolated.
24. Shower Renovation Ideas For Small Bathroom Layouts
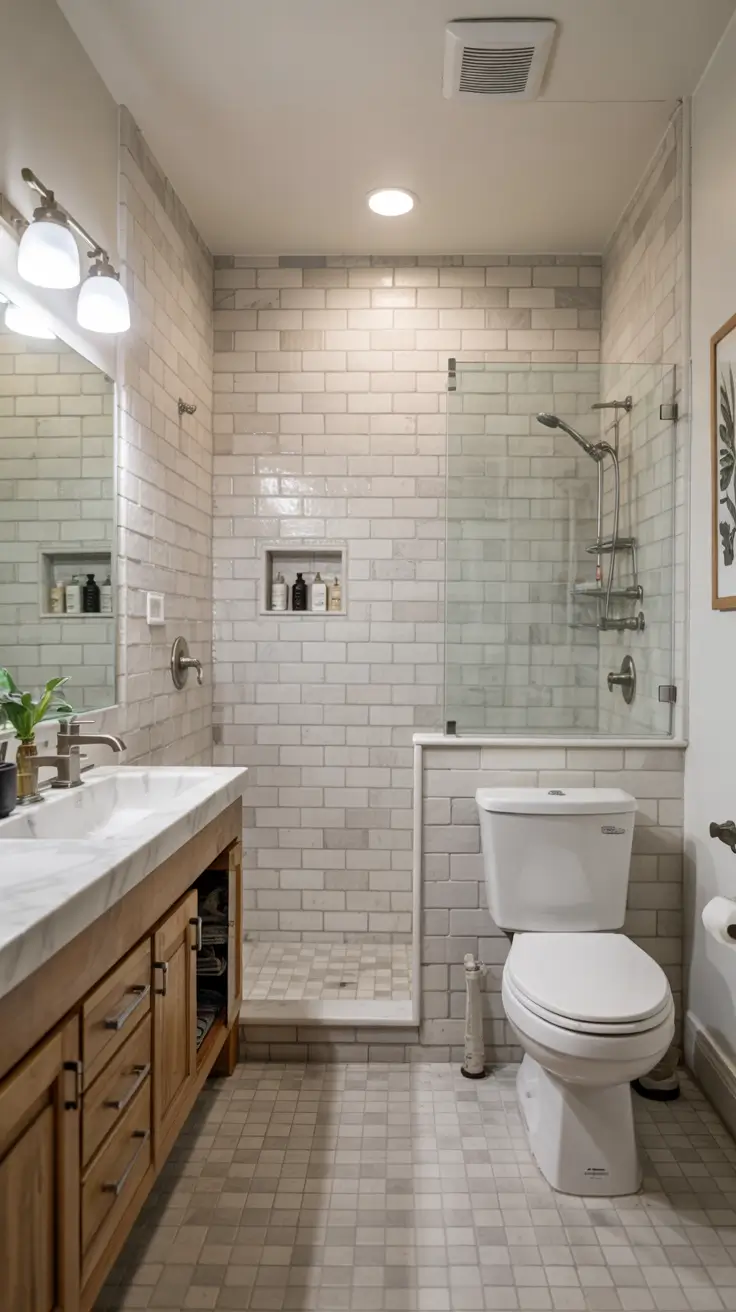
Small bathrooms demand smart layout choices more than expensive finishes. My priority is to make the shower feel like it belongs in the room rather than stealing space from circulation. I usually aim for a compact walk in or a corner shower with clear glass, because visual openness matters. When people search small shower remodel on a budget bathroom renovations, they often need a plan that looks bigger without physically expanding. The good news is that a few strategic decisions can change everything.

For the shower, I like a single glass panel instead of a bulky framed enclosure, plus light colored tile to bounce light around. A vertical niche stack can replace caddies and keep the floor clear, and I often add a slim corner bench if there is room. If the ceiling is low, I keep the showerhead and light placement proportional so the space does not feel cramped. In tight layouts, a pocket door or outward swinging door can free up valuable clearance near the vanity. I also like wall mounted storage, like a shallow cabinet or open shelves, so the floor stays open.
In my own projects, the biggest before and after difference comes from controlling clutter. When the shower zone is clean and the sightlines are open, the whole bathroom feels calmer. Many design pros emphasize that consistent surfaces help small rooms feel larger, so I often extend the same tile from the shower to the main floor. I also keep grout in a close tone to the tile to avoid a busy grid effect. These moves do not require luxury spending, they require good editing.
What I would add to finish the small layout concept is better lighting and a few space saving details. I would include a larger mirror, a brighter vanity light, and at least one recessed light to eliminate dark corners. I would also add a hook rail for towels and robes so they do not pile up on the vanity. If the shower is the only wet zone, I would consider a water resistant paint and a proper fan to protect the rest of the room. Those additions make the layout work in real daily life.
25. Tub And Shower Renovation Ideas For Family Homes
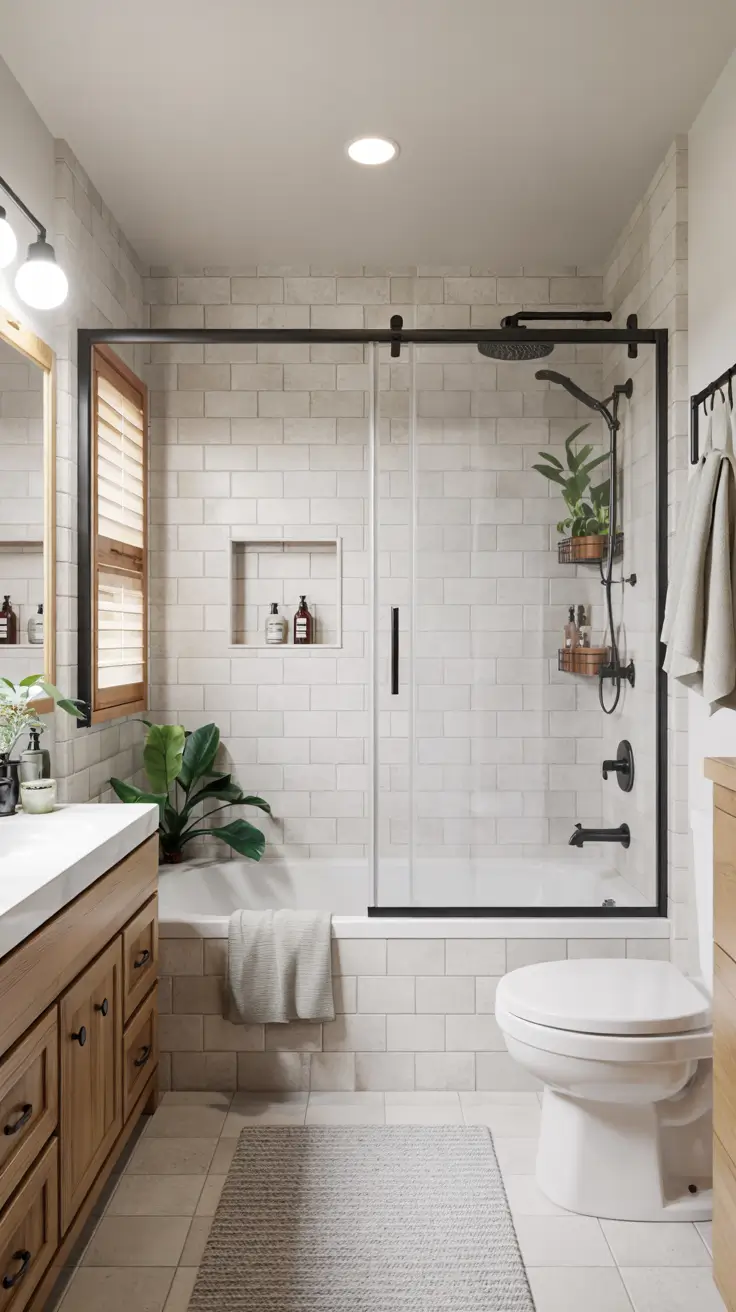
In a family bathroom, I think function has to lead because this space gets used by different ages and routines. A tub and shower setup is often the most flexible option, especially when kids are involved or guests need choices. I approach this as a durability project with easy cleaning materials and smart storage. If you are planning bathroom renovations with bathtub shower combo, I recommend designing for both bathing and quick showers without compromise. The result should look modern in the full room view while still being tough enough for daily wear.
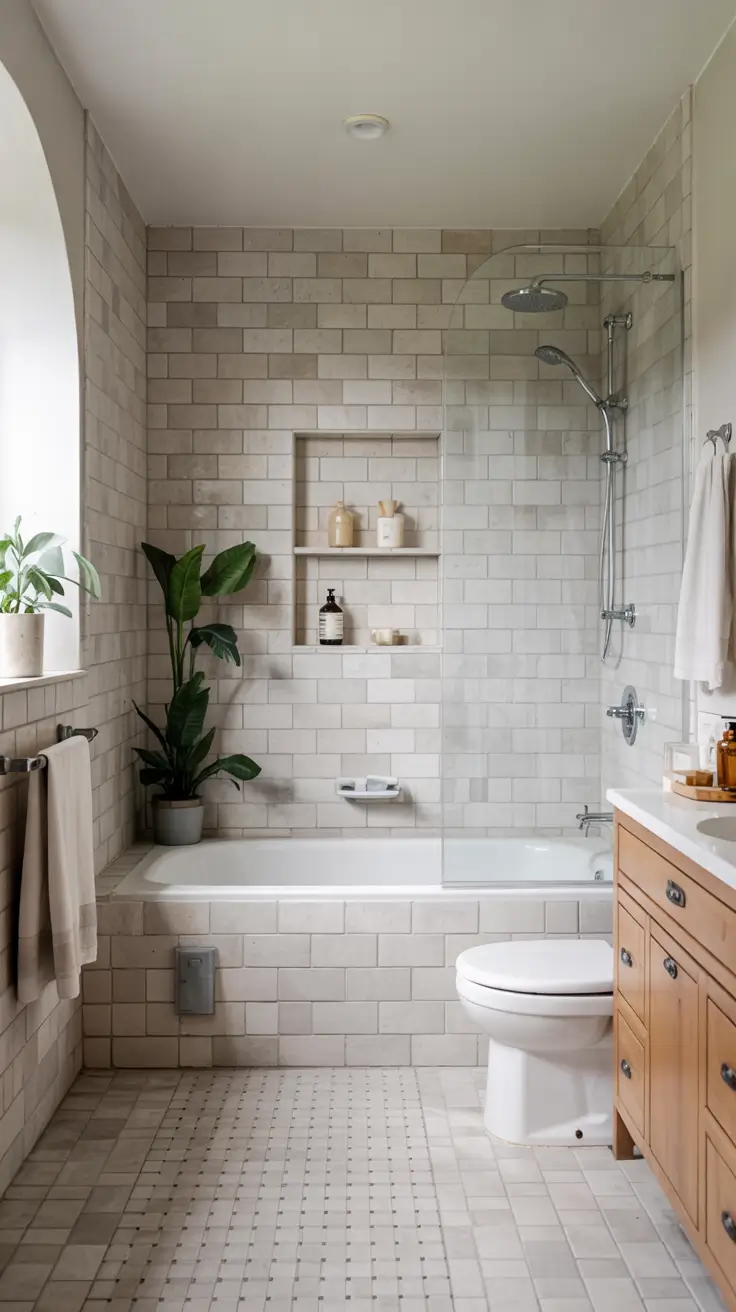
For design, I like a deep tub with a tiled surround that reaches the ceiling, paired with a curved or straight shower rod and a high quality liner system if glass is not practical. If you want a cleaner look, a fixed glass panel over the tub can modernize the combo while keeping splash controlled. I often use a large niche or a built in ledge for bottles so corners stay clear. Slip resistant flooring, a handheld showerhead, and a pressure balanced valve add safety and comfort. If the room can handle it, a double vanity can reduce morning bottlenecks, but I keep its scale proportional.
From my experience, families appreciate a setup that feels intuitive. I have seen shower renovations fail when storage is missing and products end up on the tub edge where they fall and stain. Many home design editors repeat the same practical guidance: prioritize easy to clean surfaces and simple hardware for high traffic bathrooms. I also recommend a soft close toilet seat, a durable vanity top, and washable paint because these rooms take a beating. A calm palette helps the space feel less chaotic even when the routine is busy.
To complete this section, I would add a few family specific extras. I would include a sturdy towel bar within reach of the tub, a laundry hamper spot, and a small step stool storage plan if kids use the sink. I would also add a handheld sprayer with a longer hose for bathing children and rinsing the tub. If the budget allows, I would add a built in recess for bath toys so they are not scattered. Those details make the combo feel designed, not accidental.
26. Bathtub Shower Renovation Ideas With Modern Upgrades
Modernizing a bathtub shower combo is one of the fastest ways to update a bathroom without changing the footprint. I focus on cleaner lines, better water control, and materials that look current in 2026. The best upgrades usually make the space feel more like a hotel bathroom, even if you keep the tub. This is a smart direction for shower renovation ideas on a budget because you can concentrate spending on a few high impact items. The key is making the combo feel intentional and visually streamlined.
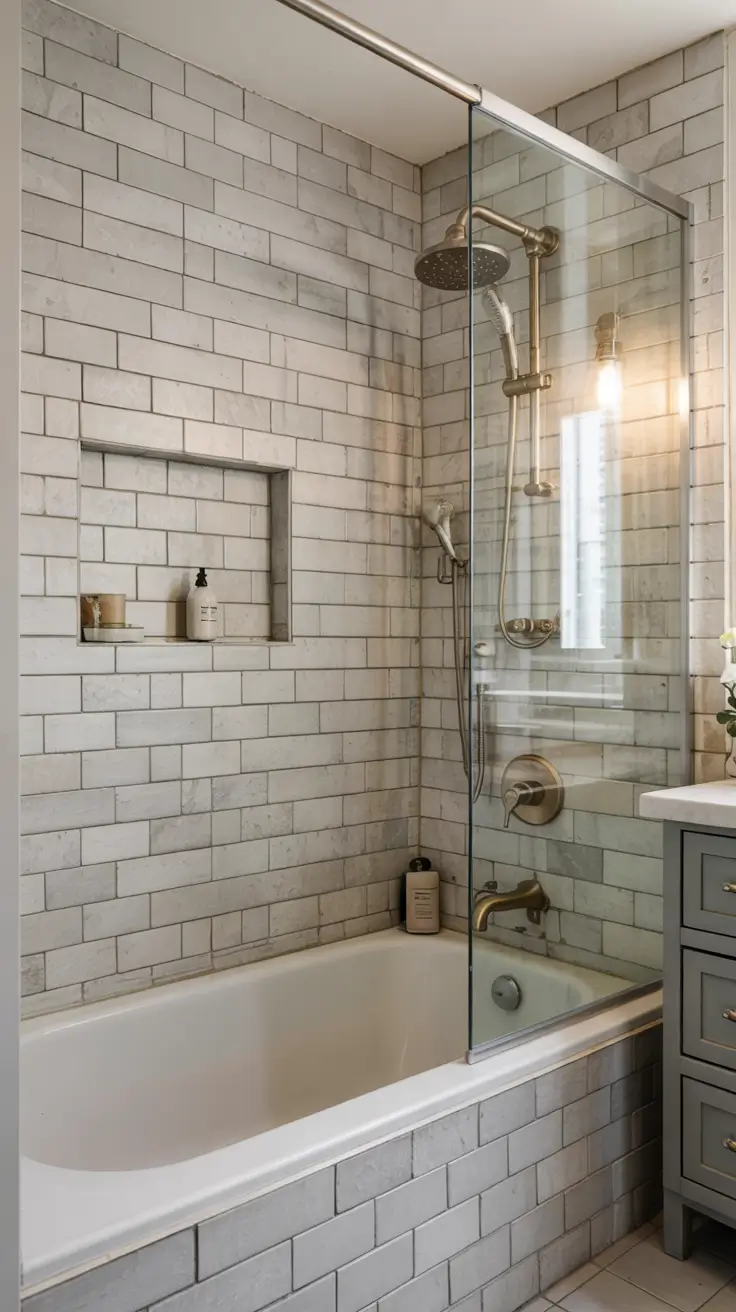
I like starting with the surround: large format tile, a simple vertical stacked layout, or a refined stone look porcelain can instantly modernize. Swap the faucet and showerhead for a coordinated set, ideally with a handheld option, and keep the metal finish consistent. A fixed glass panel or a minimal framed slider can replace a dated curtain and make the room feel brighter. Add a recessed niche, a narrow shelf ledge, and a bright, warm light over the wet zone. If the tub is in good condition, reglazing can be a cost effective way to refresh without demolition.
In my opinion, the biggest modern upgrade is improving how the shower feels to use. A good valve that keeps temperature stable is a daily luxury, and it is often worth more than decorative extras. Many renovation guides stress that water management and waterproofing details matter as much as tile style, and I agree. I also find that modern bathrooms look best when accessories are pared back, so I avoid bulky caddies and over decorated shelves. When the surfaces are clean, the whole room reads newer.
What I would add here is a finishing plan for the rest of the bathroom so the upgraded combo does not look isolated. I would coordinate the vanity hardware with the shower fixtures, update the mirror to a simpler shape, and choose a fresh wall color that complements the tile. I would also add a bath friendly mat and a hook set placed where wet towels can dry quickly. If storage is limited, a shallow cabinet over the toilet can hold extras without crowding the room. Those additions help the modern upgrades feel complete.
27. Bath To Shower Renovation Ideas For Space Efficiency
A bath to shower conversion is often about reclaiming floor area and improving accessibility. I consider this one of the most effective space moves in older homes where tubs take up visual and physical room. A well planned conversion can make the bathroom feel larger, brighter, and easier to clean. This approach also fits shower renovation diy planning in the early stages, like measuring, layout sketching, and choosing systems, even if pros handle waterproofing. If you want a modern stand up shower that feels open, a conversion is a strong path.
For layout, I like a walk in shower that uses the full tub footprint, with a single glass panel or a glass door depending on splash needs. A linear drain can support a clean tile layout and make the floor feel more continuous. I often add a bench or a slim fold down seat, plus a niche that aligns with the tile grid. If the bathroom is narrow, I keep the door swing in mind and consider a sliding door to avoid conflicts. Finishes like textured porcelain for the floor and smooth tile for the walls balance safety and easy cleaning.
In my experience, the best conversions feel like they were always meant to be showers. That comes from aligning tile lines, centering the valve, and choosing a glass style that matches the room. Many pros also stress that the shower pan, waterproofing membrane, and slope are non negotiable, and I treat those as the foundation of the project. I also recommend planning for grab bar reinforcement even if you do not install bars immediately, because it future proofs the space. This is one of those shower renovations where good construction details matter more than trendy looks.
What I would add to finalize this section is a water control and storage checklist. I would include a handheld sprayer for cleaning, a squeegee hook, and a small shelf near the shower exit for daily items. I would also add brighter lighting and a strong exhaust fan because open showers spread moisture into the room more easily. If there is no window, I would be extra careful about ventilation and consider a humidity sensing fan. Those additions protect the renovation and improve daily comfort.
28. Shower Renovation Ideas On A Budget For Renters
Renters can still create a cleaner, more modern shower experience without permanent changes. I treat this as a reversible makeover where the goal is a big visual improvement with minimal risk. This category of shower renovation on a budget is about smart swaps, better organization, and surface refresh strategies that can be removed later. If you are looking for shower renovation ideas on a budget, renters often get the most value from changes that improve light, cleanliness, and cohesion. The full room should look more pulled together even if the layout stays the same.
For renter friendly moves, I like upgrading the showerhead, adding a better curtain and liner, and using a curved rod to create more elbow room. Peel and stick options can help, but I prefer using them selectively, like a small accent strip, because steam and moisture can challenge adhesives. A tension pole caddy or a corner shelf that mounts without drilling keeps bottles off the tub edge. I also recommend matching accessories, like soap dispensers and storage bins, so the shower corner looks intentional. If the bathroom is dark, a brighter bulb and a cleaner mirror can change the mood fast.
I have seen renter makeovers look surprisingly close to a renovation when the palette is controlled. Keeping whites warm, metals consistent, and clutter minimal makes the bathroom feel newer without any demolition. Many home improvement writers repeat a practical tip that I agree with: focus on what you touch every day, like the showerhead, towel hooks, and storage. I also like using washable, mildew resistant textiles so the bathroom stays fresh. These are shower renovations in spirit, even if they are not structural.
What I would add to round out this section is a simple maintenance routine and a few finishing touches. I would include a daily spray cleaner, a weekly grout and tile scrub plan, and a squeegee to reduce water spots. I would also add two towel hooks, a small tray for toiletries, and a mat that dries quickly to prevent musty smells. If you have a shower renovation with window, I would use it for ventilation daily and keep the sill clear with a slim plant or tray. Those small steps make a budget renter refresh feel consistently clean and styled.
29. Caravan Shower Renovation Ideas For Travel Living
When I plan a caravan shower update, I treat it like a small-bathroom engineering project with a design finish. The goal is to make the space feel clean, bright, and easy to dry out, because moisture is the real enemy in travel living. I lean toward a simple layout with a standing shower footprint, smooth wall panels, and a high-contrast floor that helps you see water and soap quickly. For a tiny space, the best-looking results usually come from fewer materials, fewer seams, and one consistent color story. I also prioritize ventilation and quick-dry surfaces so the room does not feel damp after the first use of the day.
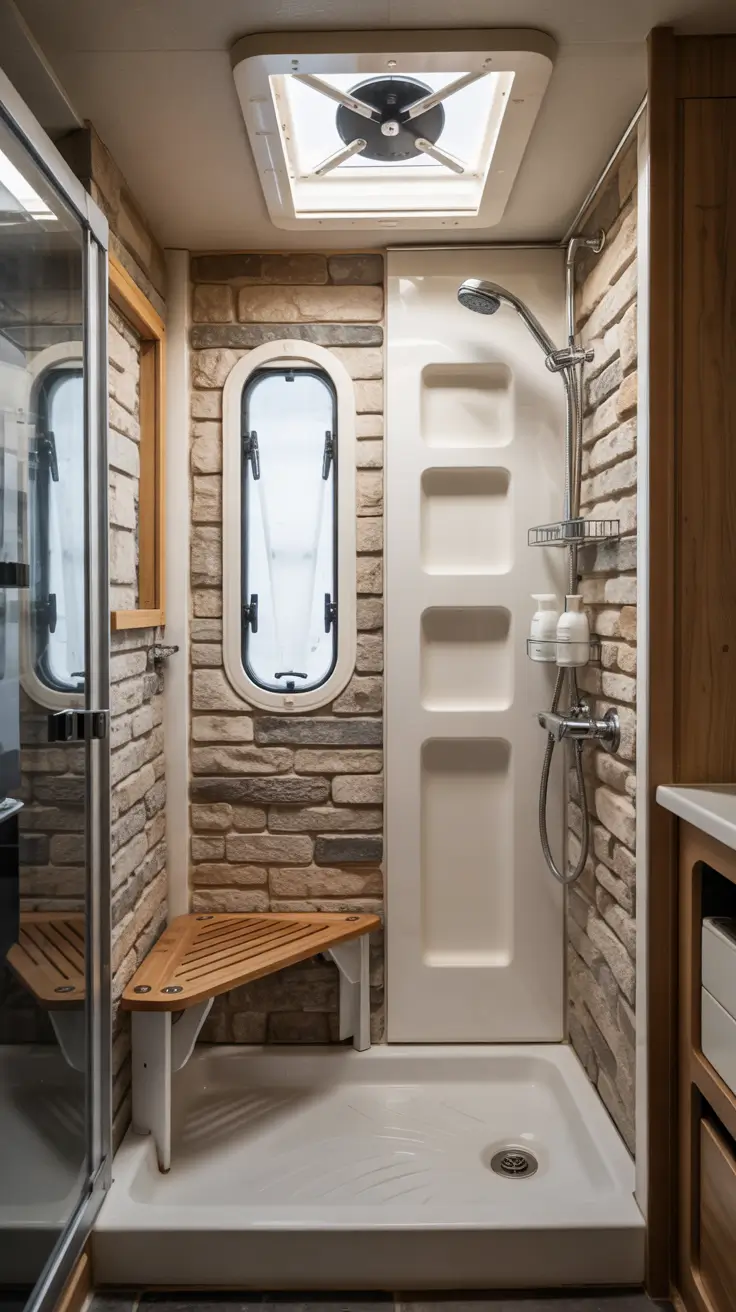
In a caravan, I like a lightweight wall system that mimics shower renovation tile without adding bulk, paired with a slip-resistant shower pan. I often add a compact fold-down teak seat or a narrow corner perch, because a tiny shower feels more luxurious when you can pause without blocking the drain. For storage, I use recessed niches or slim vertical caddies that mount into studs, and I choose shatter-resistant accessories like acrylic shelves and rounded hooks. A handheld showerhead on a slide bar is one of my favorite upgrades, because it helps with cleaning and rinsing in a tight room. If there is a shower renovation with window option in your layout, I keep the trim simple, seal it carefully, and use a privacy film so daylight becomes a feature instead of a compromise.
Personally, I have found that the biggest difference in travel showers is not fancy hardware, it is smart drying habits built into the design. I like a squeegee hook near the door and a towel bar that is close enough to grab without dripping across the floor. If you want this section to feel complete, I would add a short checklist of materials that handle vibration well, plus a quick note on what to avoid, like brittle tile grout lines and heavy glass doors that can rattle on the road.
30. RV Shower Renovation Ideas With Smart Storage
For an RV shower, I start by mapping daily routines, because storage is what decides whether the room feels calm or cluttered. My favorite shower renovation ideas on a budget for RVs focus on organization that looks built-in, even if it is modular. I keep the palette modern with warm whites, soft grays, and matte black or brushed nickel hardware so the space feels current in 2026. Because RV bathrooms are often narrow, I plan clear sightlines and keep the shower entry as open as possible. When it is done right, the room reads like a compact spa instead of a utility corner.
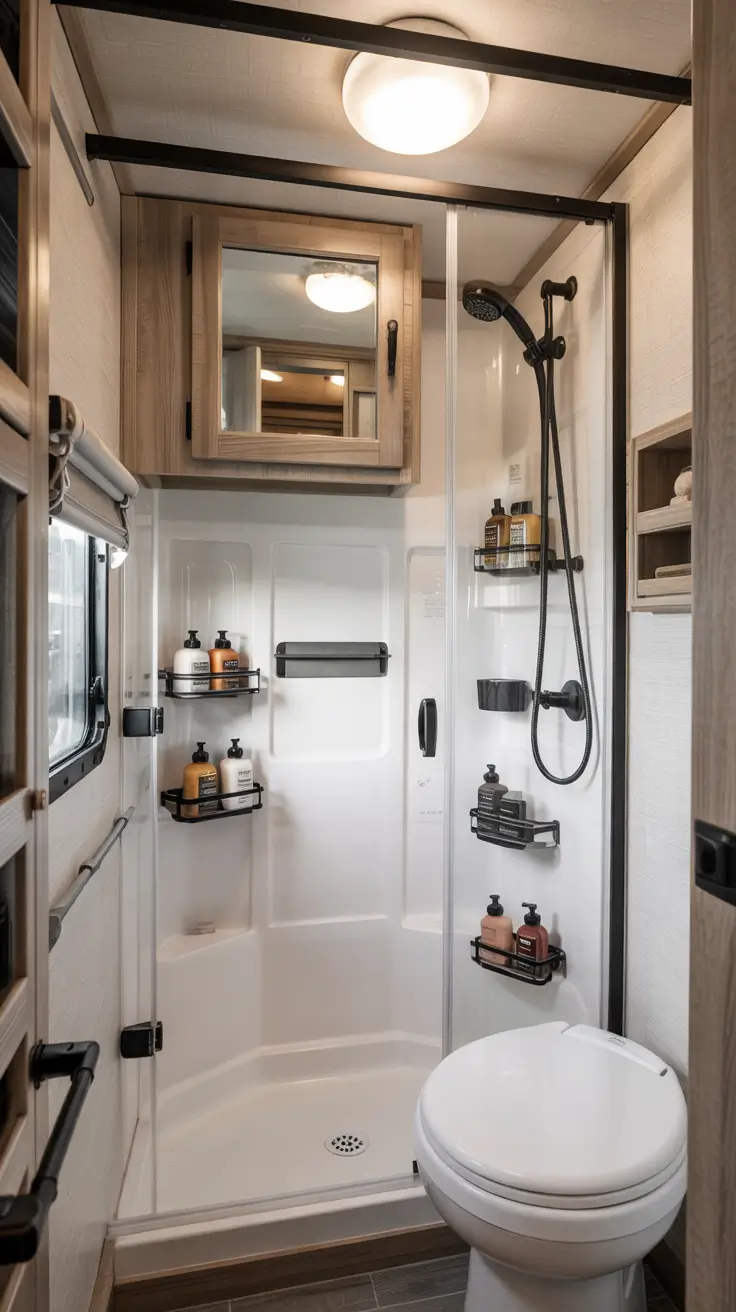
I like to build storage in layers: a recessed niche for shampoo, a narrow ledge for soap, and hooks for loofahs and razors. If the layout allows it, I use a shallow cabinet above the toilet with a mirrored door to visually expand the small bathroom, and I choose containers that match so everything looks intentional. A curved shower rod or a slightly angled door can add elbow room without changing plumbing. I often recommend a semi-frameless glass look using lightweight panels, because it gives that modern shower renovation before and after transformation without the heavy feel of full glass. For RV-friendly lighting, I add a bright, wet-rated ceiling light and a softer vanity light so the bathroom works at night without feeling harsh.
In my experience, the storage that matters most is the storage you can reach with wet hands without knocking bottles over. That is why I avoid deep corner baskets and instead use vertical organizers that keep items visible. If this section needs anything, I would add a quick example of a cheap, easy labeling system and a note on choosing rust-resistant finishes, because humidity in an RV can ruin hardware faster than people expect.
31. Camper Shower Renovation Ideas For Compact Comfort
A camper shower can feel cramped, but I have seen compact comfort happen with a few deliberate choices. I focus on making the shower feel taller and brighter, which is often more important than making it larger. Light wall finishes, a continuous ceiling color, and a clear shower zone boundary help the room feel organized. I also think about sound and vibration, since campers move, and I want every component to feel secure. If you are doing a shower renovation diy, the planning stage is where you win, because mistakes are harder to hide in a tiny bathroom.
For materials, I like wall panels that imitate stone or large-format tile, because they deliver the shower renovation tile look with fewer seams. A small bench, even a slim floating one, improves comfort for shaving and makes the shower feel more intentional. I usually select a handheld plus a compact overhead head, so you can switch based on water pressure and tank limits. For the door, I prefer a sliding solution when possible, because it saves swing space and prevents towels from getting caught. If you are chasing shower renovation on a budget, swapping in a high-quality showerhead, a new drain cover, and coordinated accessories can create a noticeable refresh without touching plumbing.
My personal rule is that a camper bathroom should be easy to wipe down in under two minutes. That mindset leads me to fewer corners, fewer ledges, and accessories that can be removed and cleaned. To strengthen this section, I would add a mini guide on choosing slip resistance for the shower floor and a short note on where to spend a little more, like waterproof sealants and a reliable exhaust fan.
32. Easy Shower Renovation Ideas With Quick Results
Not every update needs to be a full gut job, and some of the best shower renovations are the ones you can feel immediately. When I want quick results, I look for changes that improve brightness, reduce visual clutter, and make cleaning easier. This is where shower renovation ideas on a budget shine, because small swaps can create a strong shower renovation before and after effect in a weekend. I also keep the design modern by matching finishes and simplifying the color palette. If you want easy progress, choose upgrades that do not require moving plumbing or rebuilding the shower pan.
I start with surfaces and fixtures: a new showerhead, a fresh valve trim kit, and updated handles can modernize the space fast. Then I tackle storage by adding a recessed niche if the wall allows, or a coordinated set of corner shelves if it does not. Replacing a tired curtain with a clean glass-look panel, even a partial panel, can make the shower feel like a walk in zone without a full rebuild. I also like to upgrade lighting with a brighter wet-rated fixture, and I replace caulk lines carefully because fresh caulk makes everything look newer. For a shower renovation diy approach, I recommend taking time on waterproofing details, because sloppy sealing ruins the look and the longevity.
I have found that quick renovations work best when you commit to one style direction, like modern minimal, warm spa, or clean coastal. Mixing too many finishes is where fast projects start looking pieced together. If this section needs more, I would add a short shopping list of the most impactful, cheap upgrades and a simple order of operations so readers can avoid redoing work.
33. Master Bathroom Shower Renovation Design Trends 2026
In a master bath, I treat the shower as the anchor of the room, and I design around comfort and daily flow. For master shower renovation ideas in 2026, I see a strong move toward calm, hotel-like spaces with warm neutrals, textured surfaces, and fewer visual breaks. A modern master shower often includes a walk in layout, a bench, and lighting that flatters rather than floods. If space allows, a double shower setup can be practical for couples, but it only works if water pressure and drainage are planned correctly. I also like to include at least one element that feels personal, like a stone ledge for candles or a niche sized for specific products.
Material choices make or break the master shower. I often use large-format porcelain to reduce grout, or I do a feature wall with true shower renovation tile for texture and depth. Frameless glass is still a favorite, because it keeps the room open and lets the tile work show, but I balance it with warmth like wood tones or brushed metals. Steam features are becoming more common, and even if you do not add full steam, a well-sealed enclosure and a comfortable bench can mimic that cozy, spa-like feeling. If you are converting a bath to shower, I plan the new footprint carefully so the room does not feel off-balance, and I make sure the new shower has storage, lighting, and a clear entry.
From my point of view, a master shower should feel easy, not fussy. I want the floor to be safe, the glass to be simple to maintain, and the storage to keep counters clear. To complete this section, I would add a quick note on planning for aging in place, like adding blocking for future grab bars and choosing a curb style that can be adapted later.
34. Bathroom Shower Renovation Ideas With Built In Storage
Built-in storage is one of the smartest upgrades you can make, especially in a small bathroom where clutter shows instantly. When I design storage, I think about what gets used daily, what gets used weekly, and what should live outside the shower entirely. The best built-in solutions look like part of the architecture, not an afterthought, and they make cleaning easier because bottles are not scattered around the floor. This is a place where shower renovation ideas can feel high-end even when the budget is modest. It also helps a small shower remodel on a budget bathroom renovations plan look more polished, because organization is a form of design.
I like a mix of niches, ledges, and bench storage depending on layout. A tall vertical niche fits bottles without forcing them to lie down, and a small soap niche keeps bars from melting on the floor. If the shower has a half wall, I often add a quartz or stone cap as a shelf, which is both practical and visually clean. For bathrooms that include tub and shower zones, built-in storage can also support bathroom renovations with bathtub shower combo layouts by giving you a place for kid products, bath items, and adult skincare without crowding the rim. If you are using tile, I align niche edges with grout lines so everything looks intentional and modern.
In my experience, people underestimate how much storage they need until the shower is finished. I always recommend measuring your tallest bottles and planning the niche height accordingly. To strengthen this section, I would add a short guide to niche placement based on showerhead position and user height, plus a reminder to slope niche shelves slightly so water does not sit.
35. TV Integrated Shower Renovation Ideas For Modern Bathrooms
A TV in the bathroom can sound like a gimmick, but I have seen it work when it is integrated thoughtfully and kept visually quiet. The key is to treat the TV as part of the wall composition, not a separate gadget. I prefer a clean, modern setup where the screen sits outside the direct spray zone, aligned with tile lines or built into a recessed niche. This type of renovation is very 2026 because it blends comfort, wellness routines, and tech, but it needs practical planning. If you want the space to still feel like a bathroom, the design should stay minimal and the tech should disappear when it is off.
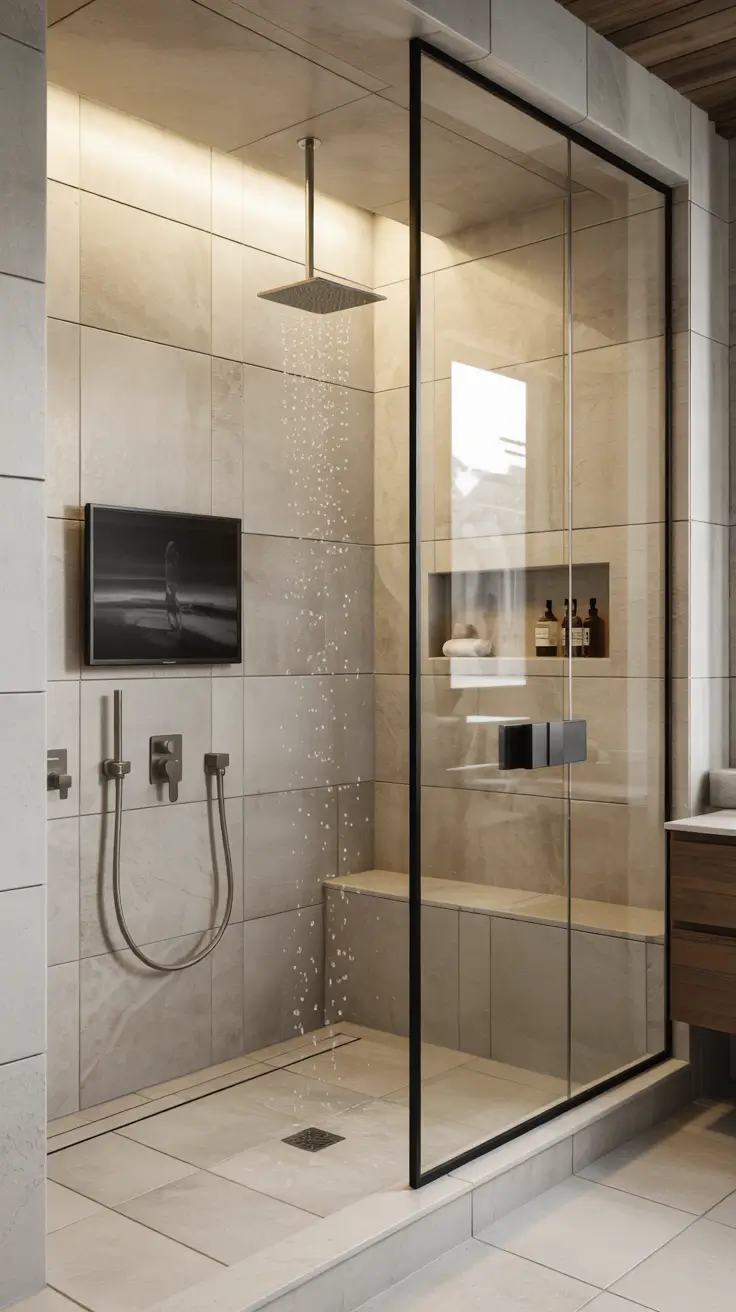
I recommend using a moisture-rated or properly protected display, paired with a ventilation plan that actually manages steam. A frameless glass enclosure helps keep the rest of the room dry, and it visually supports the modern look of a screen wall. I like to combine the TV feature with a calm material palette, like warm stone-look porcelain, matte fixtures, and soft lighting that reduces glare. If your layout includes a shower renovation with tub, the TV is often best positioned for both soaking and showering, so it becomes a shared focal point. Storage still matters here, so I include at least one niche and a clean ledge, otherwise the tech wall looks great but the rest of the room feels messy.
My personal advice is to prioritize safety and simplicity over extra features. I would rather have one well-placed screen and excellent ventilation than a complicated setup that becomes a maintenance headache. To complete this section, I would add a short note on cable routing and access panels, plus a reminder to plan viewing angles from both standing and seated positions.